Akira Kurosawa: 10 essential films


Akira Kurosawa redefined the action film with his samurai epics set in Japan’s medieval past. Here are 10 of his best movies.

Akira Kurosawa

Akira Kurosawa (23 March 1910 — 6 September 1998) is one of Japanese cinema’s few household names in the west, due to such groundbreaking jidaigeki period action films as Seven Samurai (1954), The Hidden Fortress (1958) and Kagemusha (1980).
The enduring popularity of such titles lies in no small part to their open influence from Hollywood, particularly the westerns of directors such as John Ford. This in itself is reflected in the ease by which they’ve in turn established an action template so readily adapted by filmmakers from all over the world. Take a look at any recent historical epic, or indeed the Manichean battle scenes that comprise so much of Peter Jackson’s Tolkien adaptations, and try to imagine how they might look in an alternate universe in which Kurosawa never existed.
The obvious influence of these more monumental titles makes it easy to overlook the more humanistic, personal aspects of the master’s wide array of low-key, contemporary dramas and potent literary adaptations. With 30 titles to his name as a director since his 1943 debut Sanshiro Sugata (and many more as a screenwriter), distilling Kurosawa’s must-see titles into a tidy top 10 list is something of a fools errand. There is nothing subpar within this large and varied body of work, and I’ve omitted many a worthy title in the aim of giving a fuller picture of the fruits of an incredible six-decade filmmaking career.
No Regrets for Our Youth (1946)

No Regrets for Our Youth (1946)

Inspired by several real-life incidents, No Regrets for Our Youth is an intelligent and balanced drama about wavering ideologies and personal allegiances set between 1933-46, the years of imperial Japan’s increasing militarization through to its wartime defeat.
Yukie is the privileged daughter of a Kyoto University law professor who is controversially removed from his post for his leftist beliefs. The film portrays her relationships over the years with two of his former students, both rival for her affections, and her love affair and ensuing marriage to one of them, who is arrested for his anti-government activities and subsequently disappears from public view.
Kurosawa’s oeuvre is not particularly regarded for its focus on sympathetic female characters, but the central turn by Setsuko Hara (better known for her work with Yasujiro Ozu) in his fifth feature (and first of the postwar period) showcases another side to the director, and also counts as his most overtly political work.
Scandal (1950)

Scandal (1950)
The first of two films Kurosawa made for the Shochiku studio (alongside the Dostoevsky adaptation The Idiot in 1951), this punchy social drama takes a righteous swipe at the gutter press, as Toshiro Mifune’s up-and-coming painter is snapped by the paparazzi while sitting on a hotel balcony with a famous singer (played by Yoshiko Yamaguchi), the photo inspiring a fabricated story in a popular gossip magazine. Needless to say, the outraged artist refuses to take things lying down and vows to take the magazine’s editor to court.
A lesser-known work from the master, Scandal is nonetheless worth checking out not only as an example of Kurosawa’s technical virtuosity and strong compositional approach, but for its critique of some of the less palatable aspects of westernisation.

Rashomon (1950)

Rashomon (1950)
The film that launched Kurosawa’s name outside his homeland (and those of its stars Toshiro Mifune and Machiko Kyo), Rashomon’s Golden Lion Award at Venice in 1951 awakened a postwar generation of international festival and arthouse audiences to the manifold pleasures of Japanese cinema.
Combining two short stories by Ryunosuke Akutagawa, its script also broke the mould of conventional cinema plotting, introducing the concept of the unreliable narrator in its contradictory accounts of the rape of a samurai’s wife as relayed by the key suspects and witnesses to the crime, including one testimony delivered from the murdered samurai himself by a medium. The masterful atmospheric cinematography of Kazuo Miyagawa, and the late-10th-century Heian period setting adds to the haunting, purgatorial ambience.

Ikiru (1952)

Ikiru (1952)
The story of an undistinguished, time-serving civil servant who, upon learning he has stomach cancer, channels his energies into one final positive act, building a children’s playground in a disease-ridden slum quarter, is truly heart-rending stuff. Kurosawa regular Takashi Shimura is wonderful as the man who only finds meaning in his life as death rears its ugly head, while his in-laws wrangle over his pension pot. His absent presence in the final sections provides a more down-to-earth mirror inverse to Frank Capra’s It’s a Wonderful Life (1946).

Seven Samurai (1954)

Seven Samurai (1954)
Set during the civil war of the late-16th-century Warring States period, Kurosawa’s massively influential magnum opus depicts a group of masterless samurai recruited by a farming community to fend off frequent raids by a gang of bandits.
The most expensive Japanese production of its day, it introduced all the hallmarks associated with Kurosawa’s name: an epic runtime detailing the recruitment of the mercenary force, the training of the farmers, and the fortification of the village in anticipation of the climactic attack (the original western release was trimmed down from the original 207 minutes); on-location shooting with a strong focus on landscapes and environmental conditions to reflect the inner psychologies of the human elements within them; a fastidious recreation of sets, costumes and weaponry of the era; and lots and lots of stunning horse-bound battle sequences shot using multiple camera setups.

Throne of Blood (1957)

Throne of Blood (1957)
Although the script uses not a single line from its source, Kurosawa’s celebrated transplantation of Macbeth to the lawless realm of 16th-century Japan counts among the finest screen adaptations of Shakespeare ever realised, a faithful rendition of the story that works perfectly within its own historical context.
Its title translates literally as ‘Spider’s Web Castle’, and the gothic setting of a deserted castle filled with dark shadows and swathed in fog forms the perfect frame for Mifune’s tortured turn as Washizu, the samurai usurper haunted by past crimes. The austere staging and performances, drawing upon traditional Noh theatre, lend an appropriate note of theatricality to proceedings, blurring the gap between the real and the supernatural, while Kurosawa surpasses even himself with the quite jaw-dropping climax as Washizu’s violent misdeeds catch up with him.

Yojimbo (1961)

Yojimbo (1961)
Partly inspired by George Stevens’s Shane (1952), Kurosawa’s quintessential ‘samurai/western’ Yojimbo (‘The Bodyguard’) thrives on this cross-cultural synergy, right down to the soundtrack. As Mifune’s enigmatic masterless samurai roams into a desolate town overrun by grotesque rival criminal gangs, the whistling wind whisks leaves down deserted streets through which a dog runs with a severed human hand clamped in its mouth and the grimy residents, cowering behind shutters, fear to tread.
The relatively modest 110-minute runtime makes this (and its shorter 1962 follow-up Sanjuro) a more accessible entry point into Kurosawa’s oeuvre than his more grandiose swords-and-samurai sagas. With Japan’s studio system increasingly incapable of accommodating the costs of the long shooting periods and large-scale sets and action sequences required for his productions, Kurosawa left his studio Toho after Red Beard (1965). Aside from the independently produced Dodes’ka-den in 1970 (remarkably, his first film in colour), he would not direct another film in his homeland for 15 years.

Dersu Uzala (1975)

Dersu Uzala (1975)
With the financial and critical failure of Dodes’ka-den, a portrait of the grimy denizens of a shantytown on the outskirts of Tokyo, an attempted suicide threatened to put an end to Kurosawa’s career. Fortunately an invitation from the Soviet Union’s Mosfilm to helm this Siberia-set 70mm adaptation of explorer Captain Vladimir Arsenyev’s 1923 autobiography put him firmly back on the international map.
Based on Arsenyev’s encounters in 1902 with the elderly, gnomic, nature-loving scout from the nomadic Nanai tribe who lends his name to the film (and served as a model for George Lucas’s creation, Yoda), it sees Kurosawa back in epic form as the two wrestle against the ice and snow of the steppes. It received the year’s Academy Award for best foreign language film.

Ran (1985)

Ran (1985)
Following his reappearance on the world stage, Kurosawa returned to the world of jidaigeki epic with two international co-productions, Kagemusha (1980), which George Lucas and Francis Ford Coppola persuaded 20th Century Fox to part-finance, and this lavish French-Japanese co-production, which saw him returning to Shakespeare with an adaptation of King Lear.
Possessing a similar synthesis of psychological tension and austere formal elegance to its more claustrophobic companion piece, Throne of Blood, it is even bigger and bolder in ambition. With its accumulated wide-shots of threatening ranks of horsemen clutching banners assembled on distant hilltops and a standout scene in which overthrown warlord Hidetora wanders in a confused daze from the apocalyptic conflagration of his besieged castle, every image is so meticulously composed, every scene so perfectly constructed, as to provide the kind of satori moments of transcendent stupefaction all but lost in the CG age.

Madadayo (1993)

Madadayo (1993)
Devoid of the elaborate action sequences and intense inner dramas for which he is renowned, and featuring a whimsical mid-section involving a missing cat that lasts almost half an hour, Kurosawa’s directorial swansong initially seems slightly underwhelming. A portrait of the academic and author Hyakken Uchida (1889–1971), unfolding across the decades following Uchida’s retirement just prior to the beginning of Second World War, much of its runtime is given over to the good cheer accompanying the riotous annual drinking parties held every year to mark his birthday by the former students who venerate him.
While the relentless verbal punning in the dialogue is occasionally lost in translation (the title, meaning ‘Not Yet’, alludes to a legend about an old man who refuses to relinquish his hold on life), the discernible self-reflective aspect to this celebration of a life well-lived nevertheless has an undeniable poignancy. The final sequence is as fitting a coda to the astounding career of this legendary filmmaker as one could ever wish for.

Blogger-Akash Shinde😍 (Assistant Director)

Student Of Journalism and Mass communication.

How to Breakdown Script guide step by step

You have got the green light. Your shoot is coming up. Your next task? Create a script breakdown. The script breakdown sheets are used to determine the shooting requirements of every scene and also inform the budget. But do you know how to break down a script like a seasoned pro?

In this post, we’ll review the complete process of marking (or “tagging”) scene elements to create a script breakdown. Follow these six steps and learn how to break down a script every possible way — including the best way. We’ll also give you a free script breakdown sheets PDF template that you can download and take offline.

to identify all the script elements needed to prep, schedule, and budget a film production. A breakdown happens at a scene level. The person tasked with the job will create scene breakdown after scene breakdown until a full, start-to-finish script breakdown is completed. This will be used to determine technical and creative requirements for each department.

A script breakdown element is an object, person, or process that is identified when creating a scene breakdown, such as:

Cast / Characters
Extras
Props
Set Dressing
Costumes
Makeup
Vehicles
Stunts
Special Effects or VFX
Livestock
Sound
Music
Special Equipment
Okay, we all agree it’s important. Now let’s dive into how to break down a script. We’ll show you all the different methods, tell you which one is the best, and share script breakdown examples.

STARTING YOUR SCRIPT BREAKDOWN

  1. Read the script as if you were a viewer
    Before you mark anything on the script, read the script from an audience’s perspective. You only have one first impression of the story, so give yourself a chance to connect to it.

Beyond the emotional connection, the more familiar you are with the story, the more likely you will be to identify all the elements once you begin marking the script.

How to Break Down a Script – Reading the Screenplay Again
WHO MARKS THE SCRIPT?
The producer usually completes a simple script breakdown first in order to create a preliminary shooting schedule and budget.

The 1st AD then conducts a more comprehensive script breakdown to create the stripboard, scene breakdown, and production shooting schedule.

The DP marks the script to generate a shot list and equipment requirements. Other department keys (i.e. production design) will do their own analyses as well.

REFORMAT THE SCRIPT

  1. Scan for script formatting errors
    After you have read the script all the way through, read it once more, this time scanning for any formatting errors that may cause hiccups when importing the script file into scheduling software such as Movie Magic Scheduling or StudioBinder.

How to Break Down a Script – Formatting Screenplay on Computer
THE MOST COMMON FORMATTING ERRORS TO LOOK OUT FOR:
Scene locations should be phrased consistently throughout the script.
Character names should be consistent as well.
Scene headers should be formatted only as INT or EXT (interior or exterior).
Scene headers should be formatted only as D or N (day or night).
Scene numbers have been generated.
These changes should be saved in your screenwriting software.

So before you start your script breakdown, Final Draft or StudioBinder’s screenwriting software.

Just go to your Documents page and you can double-check that the formatting is correct.

For example, your Characters should be formatted as Characters to avoid any potential issues.

How to Break Down a Script – Screenwriting Software – StudioBinder
StudioBinder’s screenwriting software
RELATED POSTS
Related: How to format a script for the breakdown →
Related: Create a script breakdown online →
SCRIPT BREAKDOWN 1/8 MEASUREMENTS

  1. Start breaking down your script into 8ths
    Marking 1/8s of a page is exactly like it sounds. Divide every page into eight, 1 inch parts. This measurement is used to estimate the screen time and shooting time for a scene. Script 1/8ths allow you to get on same page as your team. All puns aside, it’s useful standard of measurement.

Page 1/8ths should be visible on the top of your scene breadown sheets, breakdown reports, DOOD reports, shot lists, and shooting schedule.

Script Breakdown Sheet – Breaking Down a Script into 8ths – StudioBinder
Traditionally, the 1st AD would measure by eyeballing the script or taking actual printed script pages, a pen, and a ruler to mark 8ths.

This is still a reliable “Old Hollywood” option, but most modern productions use script breakdown software. When you import your script, the software automatically tallies each scene by 8ths.

On a typical dialogue-heavy indie production, you can expect to shoot roughly five pages per day where one page equals one minute of screen time.

PRO TIP
Remember, some things that take longer to shoot:

Stunts, Crowds, Busy Locations, Car Chases, Entrances and Exits, Action Sequences, Gunshots, Practical Special effects, and Musical Performances.

SCHEDULING MUSICAL PERFORMANCES
Be especially conscious of the ratio of screentime : page count when it comes to musical performances. Otherwise you may not budget enough time to shoot what you need.

It’s common for screenwriters to summarize on-screen performances into brief one-liners like “Stuart performs a song.” It may be only one action line in the script, but the performance could take 2-3 minutes of screen time.

The page count should reflect this and be rewritten as 2-3 pages as well. We suggest writing out all of the lyrics as dialogue, with plenty of beats and action descriptions.

RELATED POSTS
Related: How to schedule a scene breakdown →
FREE Download: Script Breakdown Template →
FREE Software: Check out script breakdown software →
TAGGING SCRIPT ELEMENTS AND GENERATING BREAKDOWN SHEETS

  1. Identify the script elements
    This step is where we get into script breakdown nitty gritty. Tagging, tallying, and keeping track of elements: that’s what it’s all about.

A script breakdown is the preproduction step that helps identify all the elements in a scene so they can be prepped prior to production and included in the shooting schedule, call sheets and various other script breakdown sheets reports.

If you’re doing this lo-fi on a physical script, it’s common to use multiple highlighters and pens to identify specific element types.

Marking a script is tedious and careful work.

Script breakdown software makes it simple to tag and track elements.
You can find “typical” script breakdown colors below. If you’re using custom script breakdown colors, be sure to include a color legend with your script breakdown sheets.

Common Script Breakdown Colors
Production Scheduling Explained – How to Make a Scene Breakdown – Script Breakdown Colors – StudioBinder
Industry standard script breakdown colors.
In truth, the script breakdown process is fun, click-and-drag experience if you’re using more modern script breakdown software.

First, you’ll import your script. The software automatically categorizes it scene by scene, so a lot of the heavy lifting is done for you.

From there, you’ll start with the first scene breakdown and keep moving ahead.

Highlight each element you want to tag and choose from a pull-down list of 22 categories (or create a custom category).

You’ll decide if you want to automatically tag the element every time it appears in the script, or only this time.

And if necessary, you’ll increase the quantity — for example, if you’re doing a baseball game scene breakdown, you might tag a baseball cap as a prop. But since there are nine players on the field for each team, you’ll actually need nine identical baseball caps (times two, if you want hats for each team). You can raise the number in the software to make it easy to track.

You might consider creating more tailored element categories and colors for your script breakdown format. Customize. Create new categories in your script breakdown software — as many as you need.

If you are shooting a horror film you may want to define all the elements related to prosthetics.

If you are shooting a western, you may need to add categories for horses and weapons.

To add a custom element, under “Elements,” you’ll click “Add New Element.” Enter your own field and assign a color, so it’ll appear when you tag the script.

You’ll also add notes whenever necessary. Need to give clarification or special instructions about a particular scene? Want to find out if an element can be changed or eliminated? Add a note for you and your collaborators to see.

See? Making a script breakdown is fun, right? It also gets you questioning how important each element really is which opens up important creative decisions.

Now keep going.

Done with the first scene breakdown? Break down the next scene, and the next scene. Break down the whole script. We still have to make reports.

RELATED POSTS
Learn More: Complete Guide to Script Elements →
Step-by-Step Guide: How to Break Down a Scene →
Get Started Free: Script Breakdown Software →
SCRIPT BREAKDOWN SHEET TEMPLATE

  1. Generate script breakdown reports
    After marking up your script, you’re ready to turn them into reports. This is a script breakdown sheet, a summary list of all the elements in a scene. Essentially, a “breakdown of your breakdown.”

There are two ways to achieve this.

  1. Free Script Breakdown Template
    Once you’ve marked up your script, you can input all your markings into this free script breakdown sheet template via Excel or Google Docs. \

The downside? There is no automation. It takes much longer to create scene breakdowns this way, and it’s prone to human error. Still, it works.

Download a free Script Breakdown Template via Google Docs.
Script Breakdown Template – Breakdown Sheet – StudioBinder
Script Breakdown Sheet Template in Excel (PDF print out)

Bear in mind, if you’re using a breakdown template, you’d need to print out the breakdown sheet for every scene. So for 120 scene script, be prepared to print at least 120 breakdown sheets to fill out by hand.

Then scan, copy, collate, and distribute. Since elements will likely change, be prepared to re-print or version your PDFs clearly.

Effective? Sure. Efficient? Not really.

So what’s the best way to create a script breakdown sheet?

  1. Script Breakdown Software
    The benefit of using an online, cloud-based script breakdown software is that tagging elements is a simple click-and-drag process which speeds up the workflow dramatically.

Free Script Breakdown Sheet – Sample Breakdown Template – Touring Man
Select and tag interface to quickly identify elements.
Additionally, since it’s online, you can share your breakdown with other department heads (e.g. art director, prop master, VFX supervisor, etc) to help you identify the elements that pertain to their department.

This distributes your workload, while ensuring a higher level of detail, oversight and quality.

You don’t need to create reports manually, script breakdown sheets, Day out of Day reports, and shooting schedules are generated for you once you tag your elements. You can view, print, generate a sharelink, or save a script breakdown sheet PDF.

Free Script Breakdown Sheet – Sample Breakdown Report – Touring Man – StudioBinder
Tagged elements automatically generate a script breakdown summary sheet.
However you choose to generate your reports, they’re the fruits of your script breakdown work. Script breakdown sheets and scene breakdown sheets give you a summarized menu of every element you’ve tagged and categorized.

They tell you, and your production team, exactly what is required for every scene.

And that’s how to break down a script for film production scheduling.

Now, on to scheduling.

RELATED POSTS
Related: How to find “hidden” shoot locations in the script →
Related: Start breaking down your script →
Related: Learn how to analyze and break down a script →
FREE Download: Script Breakdown Sheet Template →
FROM SCENE BREAKDOWN TO SHOOTING SCHEDULE

  1. Create the shooting schedule with a stripboard
    With your script marked, you’re ready to start laying out your scenes into a stripboard (or production board).

Stripboards are boards that contain color-coded strips that represent the scenes of a script. The strips (scenes) can be dragged up and down, and bucketed into “day breaks” to mark the end of every shoot day.

The end result?

A shooting schedule.

You have three basic choices to create a shooting schedule.

The “old school” way to create a shooting schedule is by using cardboard charts and strips of colored paper. This is always an option.

Another way?

  1. Film Shooting Schedule Template
    Use a shooting schedule template to manually input scenes into a spreadsheet for reordering.

The benefit? It’s free. The downside? It’s a spreadsheet, which means a lot of point-by-point data entry and room for human error.

But the most efficient way to make your shooting schedule?

  1. Film Production Scheduling Software
    Most modern productions use this cloud-based, end-to-end solution. It takes the grunt work out of the scheduling process.

You import your script right from Final Draft and it generates strips with all the metadata you need: scene headings, script content, cast members per scene, page lengths.

After that, reorder scenes to create the shooting schedule, and spin off call sheets from the day breaks to send to your cast and crew.

How to Break Down a Script – Scheduling Software – StudioBinder
End-to-end workflow: your script breakdown software is also your shooting schedule software.
With software, you’ll plan and update your production from start to finish.

Already imported your script to create your script breakdown?

No need to import it again. Just head over to the “Shooting Schedule” page to start reordering scenes and adding day breaks. If you want, you can also auto-add day breaks based on page count or estimated shoot time.

Here’s what the process looks like:

Film scheduling software goes hand-in-hand with script breakdowns.
SCRIPT BREAKDOWN RECAP
Reviewing your options
So now you know how to break down a script to understand its shooting requirements. You even know how to go all the way to making your shooting schedule.

We’ve given you a few different options to create your script breakdown.

Old School Way
You can tag elements with a printed script and highlighters. Call this “the old school” way. When it’s time to generate reports, you’ll need to use a script breakdown sheet template. You’ll have to be careful when entering data, scene breakdown sheet by scene breakdown sheet. This method involves a lot of time, attention to detail, and double-checking.

Script Breakdown Software
Or you can use script breakdown software, clicking and tagging elements as you go. After you’ve tagged your script in the software, all it takes is a click to create your script breakdown sheet. You’ll automatically get a scene breakdown sheet for every scene.

And with the shooting schedule, you can also go “Old Hollywood” or do it the modern way, with software.

Whatever style you choose, you’re now equipped with all the pre-production knowledge you need. So go prepare for your shoot!

Blogger-Akash Shinde😍 (Assistant Director)

Student of Journalism and Mass communication.
What is CallSheet using Filmmaking Process.?

Assistant Director are made by Call sheet , a call sheet outlines the schedule for every shoot day during filming. Making a call sheet takes a lot of coordinating, but it’s a necessary skill for any aspiring director to understand.

Lets First of We can understand below section..

What Is a Call Sheet?

A call sheet is a daily filming schedule created by the assistant director on a show or movie. Based on the director’s shot list, a call sheet contains important details, like the location, the cast call times (what time to arrive for work), and the shooting schedule. The document is distributed to all cast and crew so they know when to be on set and where to go.

4 Functions of a Call Sheet

A call sheet is one of the most important production documents in filmmaking. It breaks down the who, what, where, and when of the production phase on a day by day basis. The main goals of a call sheet are:

  1. To organize all cast and crew: The central function of a call sheet is ensuring the cast and crew arrive at the right place at the right time.
  2. To indicate who is required: A call sheet lets everyone know who needs to be on the film set that day.
  3. To keep a film production on schedule: A movie or show has a budget for a specific number of filming days. Any deviation from the shooting schedule can cause the project to go over budget.
  4. To set clear expectations: A call sheet lets production personnel and cast members know what scenes they will be filming that day.

13 Things You Need to Include on Your Call Sheet

From the weather forecast to the nearest hospital, a call sheet lays out the information that the crew might need during production. The first page always contains the most important details but the entire document is a carefully curated digest for that particular shoot day.

Here are 13 things to include on a call sheet:

  1. Date and day of the shoot: The date and the day of the shoot (i.e. shoot day 1 of 15) should be listed at the top of the first page.
  2. Call time: The general crew call time should be easy to find on the first page. The call time is when the crew needs to be on set and ready to start work. Cast calls are individual call times for specific actors or actresses.
  3. Production title and company: The name of the project, as well as the production company and production office contact info, should also be included on the first page.
  4. Weather: The weather forecast, including wind, temperature, and sunset times, can impact both indoor and outdoor filming and will give crew an idea of expected filming conditions.
  5. Important points of contact: The names of the director, producer, first assistant director (1st AD), and the production manager, as well as their contact information should be on the call sheet.
  6. Locations: The or addresses of filming locations, as well as any parking information. Call sheets also list the address of the nearest hospital with an emergency room.
  7. Crew list: The names and contact information for every crew member on set that day. Equipment lists are also often included here.
  8. Shooting schedule: A call sheet outlines the scenes that will be filmed that day, including the scene number, scene heading and description, what cast members are in each scene, and the location. Lunch time and the estimated wrap time will also be listed in the schedule.
  9. Cast: Cast members who needs to be on set that day are listed in this section as well as their character names and call times. Extras and stand-ins (people who stand in place of actors while technical adjustments are made to lighting and camera) also have call times and are listed just below the main cast section.
  10. General notes: These are the notes that apply to everyone on set. For instance, if there is a stunt happening that day that requires a special safety notification, it would be mentioned here.
  11. Special notes: This is where the AD lists any specific notes for departments. For instance, the prop department would look here for information about specific props needed for certain scenes.
  12. Walkie channels: Many film productions use walkie talkies on set, and different departments are assigned their own channels to communicate. While there are industry standards for channel assignment by department, it’s still important to list these on the film call sheet.
  13. Advanced schedule: An advanced schedule gives the cast and crew information about the next day’s shooting schedule so they can prepare ahead of time.

Blogger-Akash Shinde😍 (Assistant Director)

Student of Journalism and Mass communication.
Pre-production Process..

Pre Production
• Determine Your Budget
• Define Your Audience
• Clarify Your Message
• Research
• Write a story
• Look for current photos and
videos of the location
• Make a Shot List
• Get Permissions
• Determine Your Equipment
Needs.

Determine Your Budget
• Pre production costs
• Catering
• Equipment
• Props/Costumes
• Crew
• Makeup & Styling
• Location
• Logistics
• Cast
• Meetings
• Production
• Distribution
• Post Production.

Define Your Audience
• Platform
• Genre
• Preferences
• View duration
• Characteristics

Clarify Your Message
• Decide on the plot
• Research on the Topic
• Look for complications
• Look for similar concepts

BUILD a CONCEPT..idea Feast..

Research
• Look for Similar content
• Youtube
• Get inspired
• Vimeo
• Draw your Inspiration
• Film Freeway
• Talk to people
• Weekly shorts
• Look for Previous Success

Writing
• 1 Liner
• 1 Pager
• 5 Pager
• Script & Screen Play
• Shot Division
• Story Boarding.

Script
The Legal
IMPPA – Indian Motion Picture Producers’ Association
http://www.imppa.info/
Save Your Script: Just send a
mail to someone you trust!

HIRE THE KEY CREW POSITIONS
• Executive Producer
• Producer
• Director
• Line Producer
• Ist AD
• Director of Photography (DP)
• Gaffer/ Electricians
• Camera Operator
• Ist AC (Focus Puller)
• Key Grip/ Grips
• Production Designer
• Sound Technician.

DISTRIBUTION
• Private Screenings
• Film Festivals
• Youtube | Facebook | Vimeo
• Cinema Release
• OTT Release.

Hit the Festivals
Money VS Recognition
• Exposure to other filmmakers
• Film Markets
• Collaborations
• Showcase
• Grants.

THE PITCH
• Start with a 1 Liner
• Present the 1 pager or Synnopsis
• Recite the 5 Pager (1st Meeting)
• Present the Budget
• Script Reading Session (2nd Meeting)
• Lock budget and sign contract.

Blogger-Akash Shinde😍 (Assistant Director)

Student of Journalism and Mass communication.
Linear and Non-linear editing Techniques.

In the past, film editing was done in a linear fashion, where the film was literally cut into long strips divided by scene and take, and then glued or taped back together to create a film in logical sequence. This was time-consuming, tedious and highly specialized work. While linear editing is still relevant today, there is a newer and more user-friendly system available for editors: nonlinear editing. Curious about what these systems can and can’t do and the pros and cons each system has? Well, let’s take a look…

Linear Video Editing Method

Linear video editing is a process of selecting, arranging and modifying images and sound in a pre-determined, ordered sequence – from start to finish. Linear editing is most commonly used when working with videotape. Unlike film, videotape cannot be physically cut into pieces to be spliced together to create a new order. Instead, the editor must dub or record each desired video clip onto a master tape.

For example, let’s say an editor has three source tapes; A, B and C and he decided that he would use tape C first, B second and A third. He would then start by cutting up tape C to the beginning of the clip he wants to use, then as he plays tape C, it would also be simultaneously recording the clip onto a master tape. When the desired clip from tape C is done, the recording is stopped. Then the whole process is repeated with tapes B and A.

Pros vs Cons

There are a couple of disadvantages one would come across when using the linear video editing method. First, it is not possible to insert or delete scenes from the master tape without re-copying all the subsequent scenes. As each piece of video clip must be laid down in real time, you would not be able to go back to make a change without re-editing everything after the change.

Secondly, because of the overdubbing that has to take place if you want to replace a current clip with a new one, the two clips must be of the exact same length. If the new clip is too short, the tail end of the old clip will still appear on the master tape. If it’s too long, then it’ll roll into the next scene. The solution is to either make the new clip fit to the current one, or rebuild the project from the edit to the end, both of which is not very pleasant. Meanwhile, all that overdubbing also causes the image quality to degrade.

However, linear editing still has some advantages:

  • It is simple and inexpensive. There are very few complications with formats, hardware conflicts, etc.
  • For some jobs linear editing is better. For example, if all you want to do is add two sections of video together, it is a lot quicker and easier to edit tape-to-tape than to capture and edit on a hard drive.
  • Learning linear editing skills increases your knowledge base and versatility. According to many professional editors, those who learn linear editing first tend to become better all-round editors.

Nonlinear Video Editing Method

The nonlinear video editing method is a way of random access editing, which means instant access to whatever clip you want, whenever you want it. So instead of going in a set order, you are able to work on any segment of the project at any time, in any order you want. In nonlinear video editing, the original source files are not lost or modified during editing. This is done through an edit decision list (EDL), which records the decisions of the editor and can also be interchanged with other editing tools. As such, many variations of the original source files can exit without needing to store many different copies, allowing for very flexible editing. It is also easy to change cuts and undo previous decisions simply by editing the EDL, without having to have the actual film data duplicated. Loss of video quality is also avoided due to not having to repeatedly re-encode the data when different effects are applied.

Nonlinear editing differs from linear editing in several ways.

  • First, video from the sources is recorded to the editing computer’s hard drive or RAID array prior to the edit session.
  • Next, rather than laying video to the recorder in sequential shots, the segments are assembled using a video editing software program. The segments can be moved around at will in a drag-and-drop fashion.
  • Transitions can be placed between the segments. Also, most of the video editing programs have some sort of CG or character generator feature built in for lower-thirds or titles.
  • The work-in-progress can be viewed at any time during the edit in real time. Once the edit is complete, it is finally laid to video.
  • Non-linear video editing removes the need to lay down video in real time. It also allows the individual doing the editing to make changes at any point without affecting the rest of the edit.

Pros vs Cons

There are many advantages a nonlinear video editing system presents. First, it allows you access to any frame, scene, or even groups of scenes at any time. Also, as the original video footage is kept intact when editing, you are able to return to the original take whenever you like. Secondly, nonlinear video editing systems offers the flexibility of editing. You can change your mind a hundred times over and changes can also be made a hundred times over without having to start all over again with each change. Thirdly, it is also possible to edit both standard definition (SD) and high definition (HD) broadcast quality videos very quickly on normal PCs which do not have the power to do the full processing of the huge full quality high resolution data in real-time.

The biggest downside to nonlinear video editing is the cost. While the dedicated hardware and software doesn’t cost much, the computers and hard drives do, from two to five times more than the gear. As such, the average price for a basic nonlinear video editing package can come in between $5,000 and $10,000. For stand-alone systems that approach broadcast quality, the amount you pay may be twice that. However, as the nonlinear technology pushes forward, count on big gains in digital video storage and compression, as well as lower prices on computers and hard disks in the very near future.

Making the Choice

Now that you know the differences between linear and nonlinear editing systems, you are now equipped to make a choice between the two for your editing needs. But keep this in mind – on certain types of production, a linear editing system may actually be more efficient and nonlinear may reign supreme on other types of productions; so don’t write off either one. Whatever you do, just make sure to do your homework before deciding.

Blogger-Akash Shinde😍 (Assistant Director)

Student of Journalism and Mass communication.
Basic of lighting using Filmmaking…what is 3point lighting?…

Why do filmmakers need to know about 3 point lighting? It’s great for picture-day photography, but what if you’re looking for an explanation of how 3 point lighting works for film and video?

We’re going to show you why 3 point lighting is important for filmmakers, but also take you deeper into some advanced techniques, and how you can use it to effectively light large scenes.

How to setup 3 point lighting

The light sources are labeled as such:

  • Key Light — Used as your primary lighting point
  • Fill Light — Used to fill opposite the key light
  • Backlight — Used to extract the third dimension.

point video lighting is all about creating a three-dimensional look. By placing three light sources at strategic points around the subject, each light source illuminates a separate dimension of the subject and creates an image with greater representation of height, width, and depth.

Three Point Lighting - Three Point Lighting Setup - StudioBinder

Three point lighting deals with the relationship each light has with one another. This is called the light intensity ratio. 

Generally, the key light to fill light ratio is 2:1.

This means that your key light should be twice as bright as your fill light. The relationship of intensity and placement can change depending on your goals, but the above ratio will give you a relatively cinematic look for narrative filmmaking and even some YouTube videos. 

If you’re doing a commercial or corporate video, you may want the ratio to be closer to 1.5:1 so that you get a much more inviting image. If you use a 1:1 ratio, your image may be too flat and devoid of dimensional benefits.

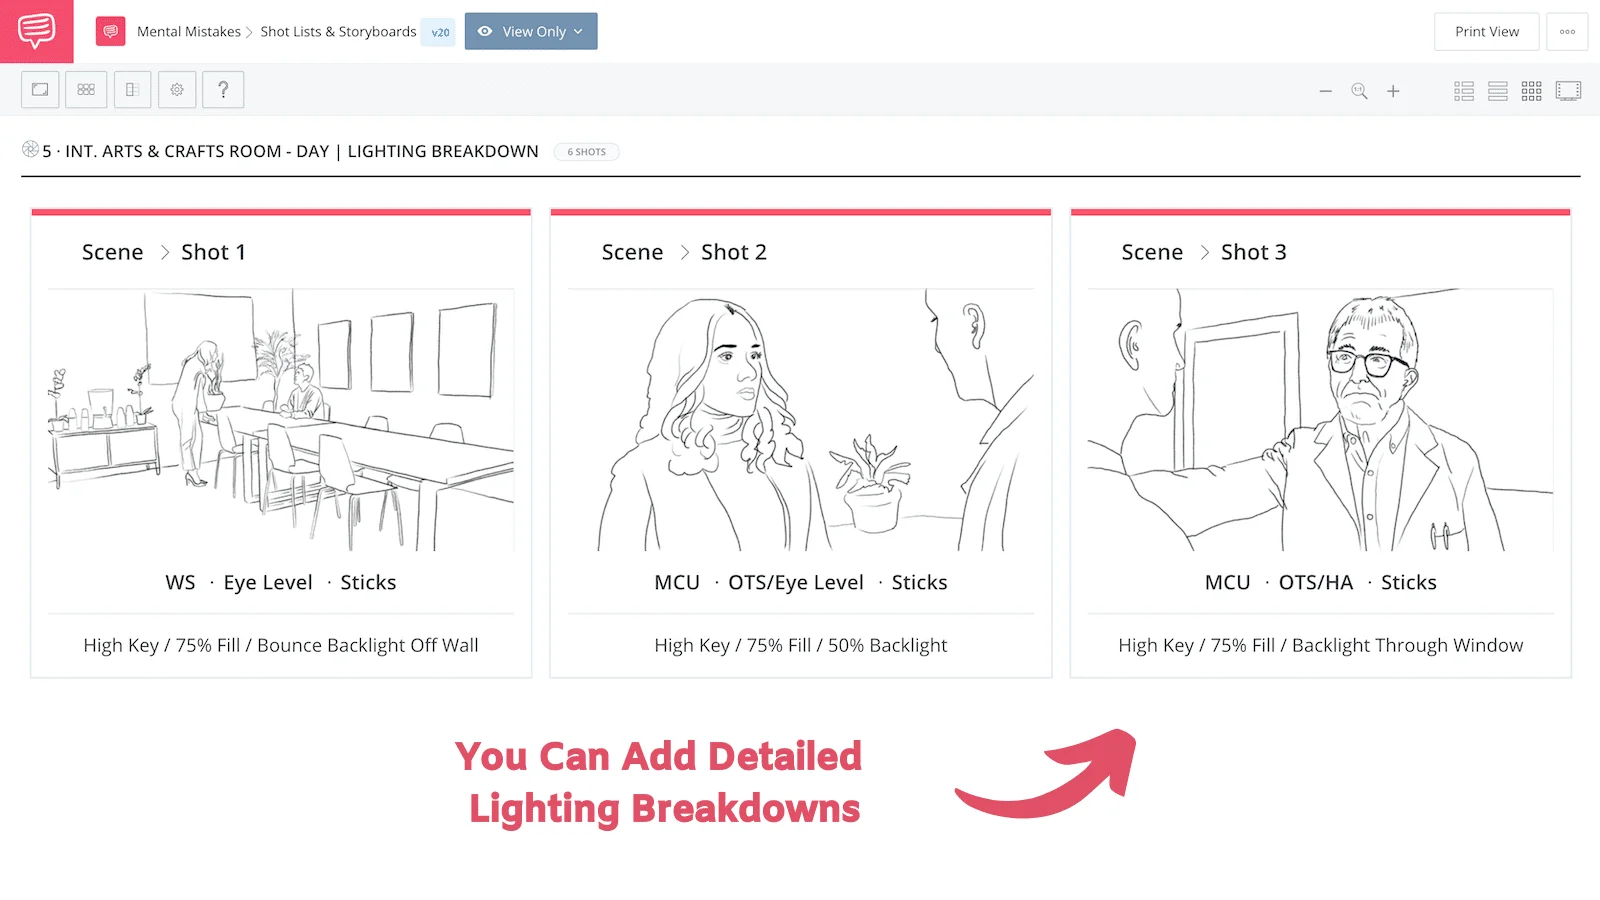
Take a look at the 3 point lighting plan for our comedy, Mental Mistakes:

3 Point Lighting Guide - Mental Mistakes - Scene Storyboard - StudioBinder

Mental Mistakes Lighting  •  Shot Listed in StudioBinder

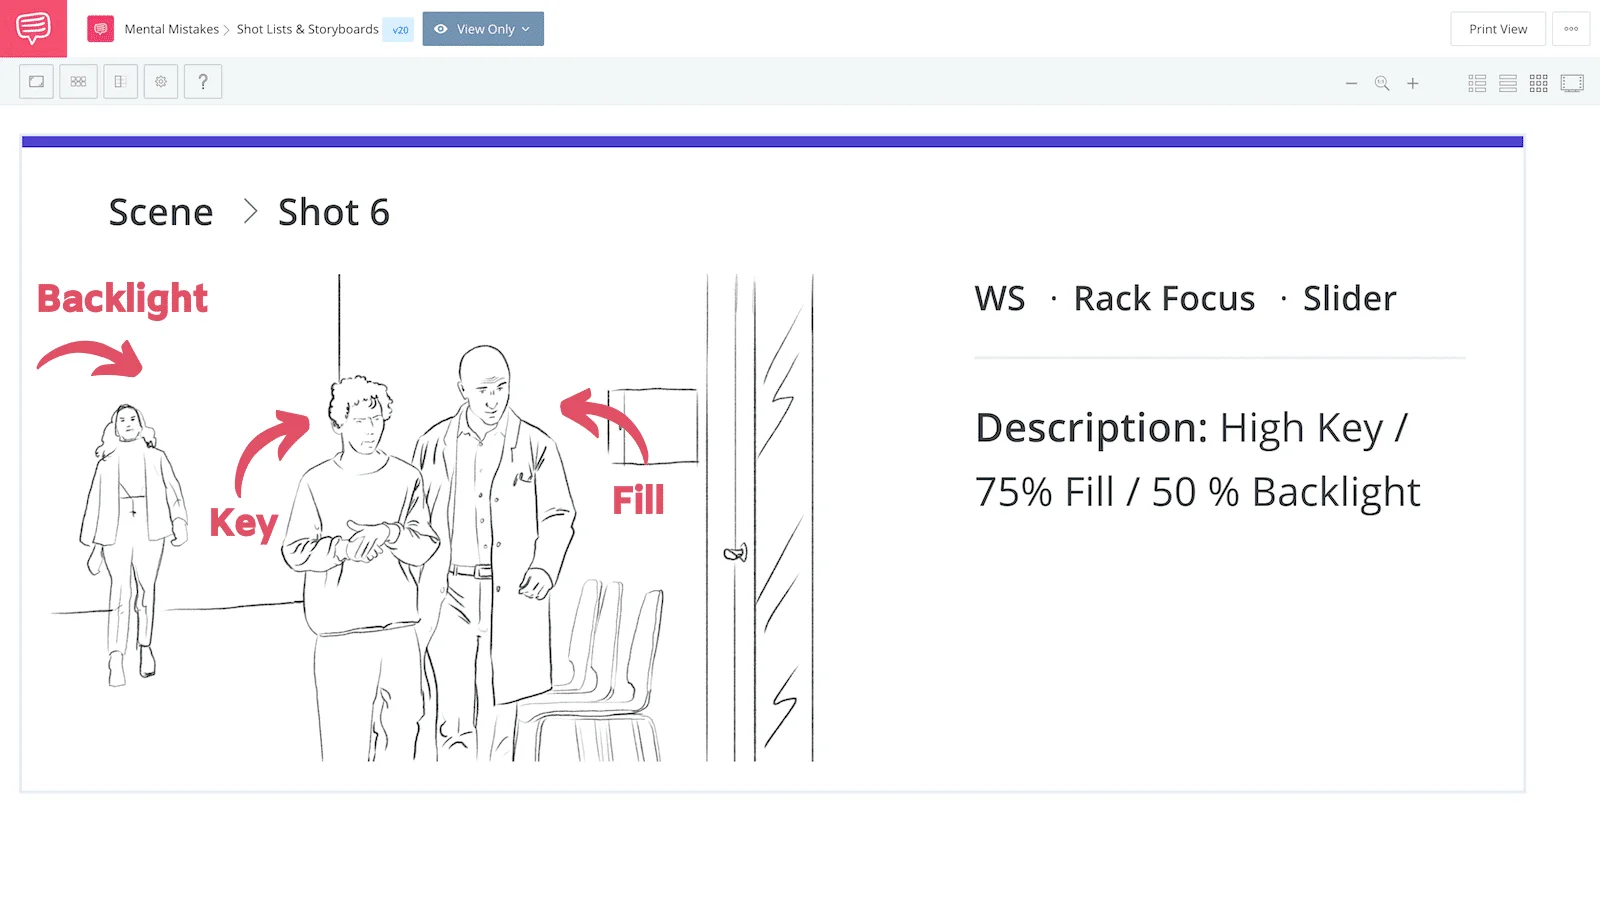
This shoot included 3 point lighting setups that were used to light multiple characters across various sections fo a room:

3 Point Lighting Guide - Mental Mistakes - Hallway Storyboard - StudioBinder

3 Point Lighting Setup for Comedy  •  Shot Listed in StudioBinder

Film lighting is all based on light source intensity and angles:

  • Source of light — refers to the physical origin
  • Angle of light — refers to the path of approach
  • Intensity of light — refers to the amount/brightness 

For instance, the sun is a single source of light, but it can approach your subject from various angles. You can use the sun to create a complete three point lighting setup for your video by cutting off angles with flags, bouncing light with reflectors, and diffusing light with various materials.

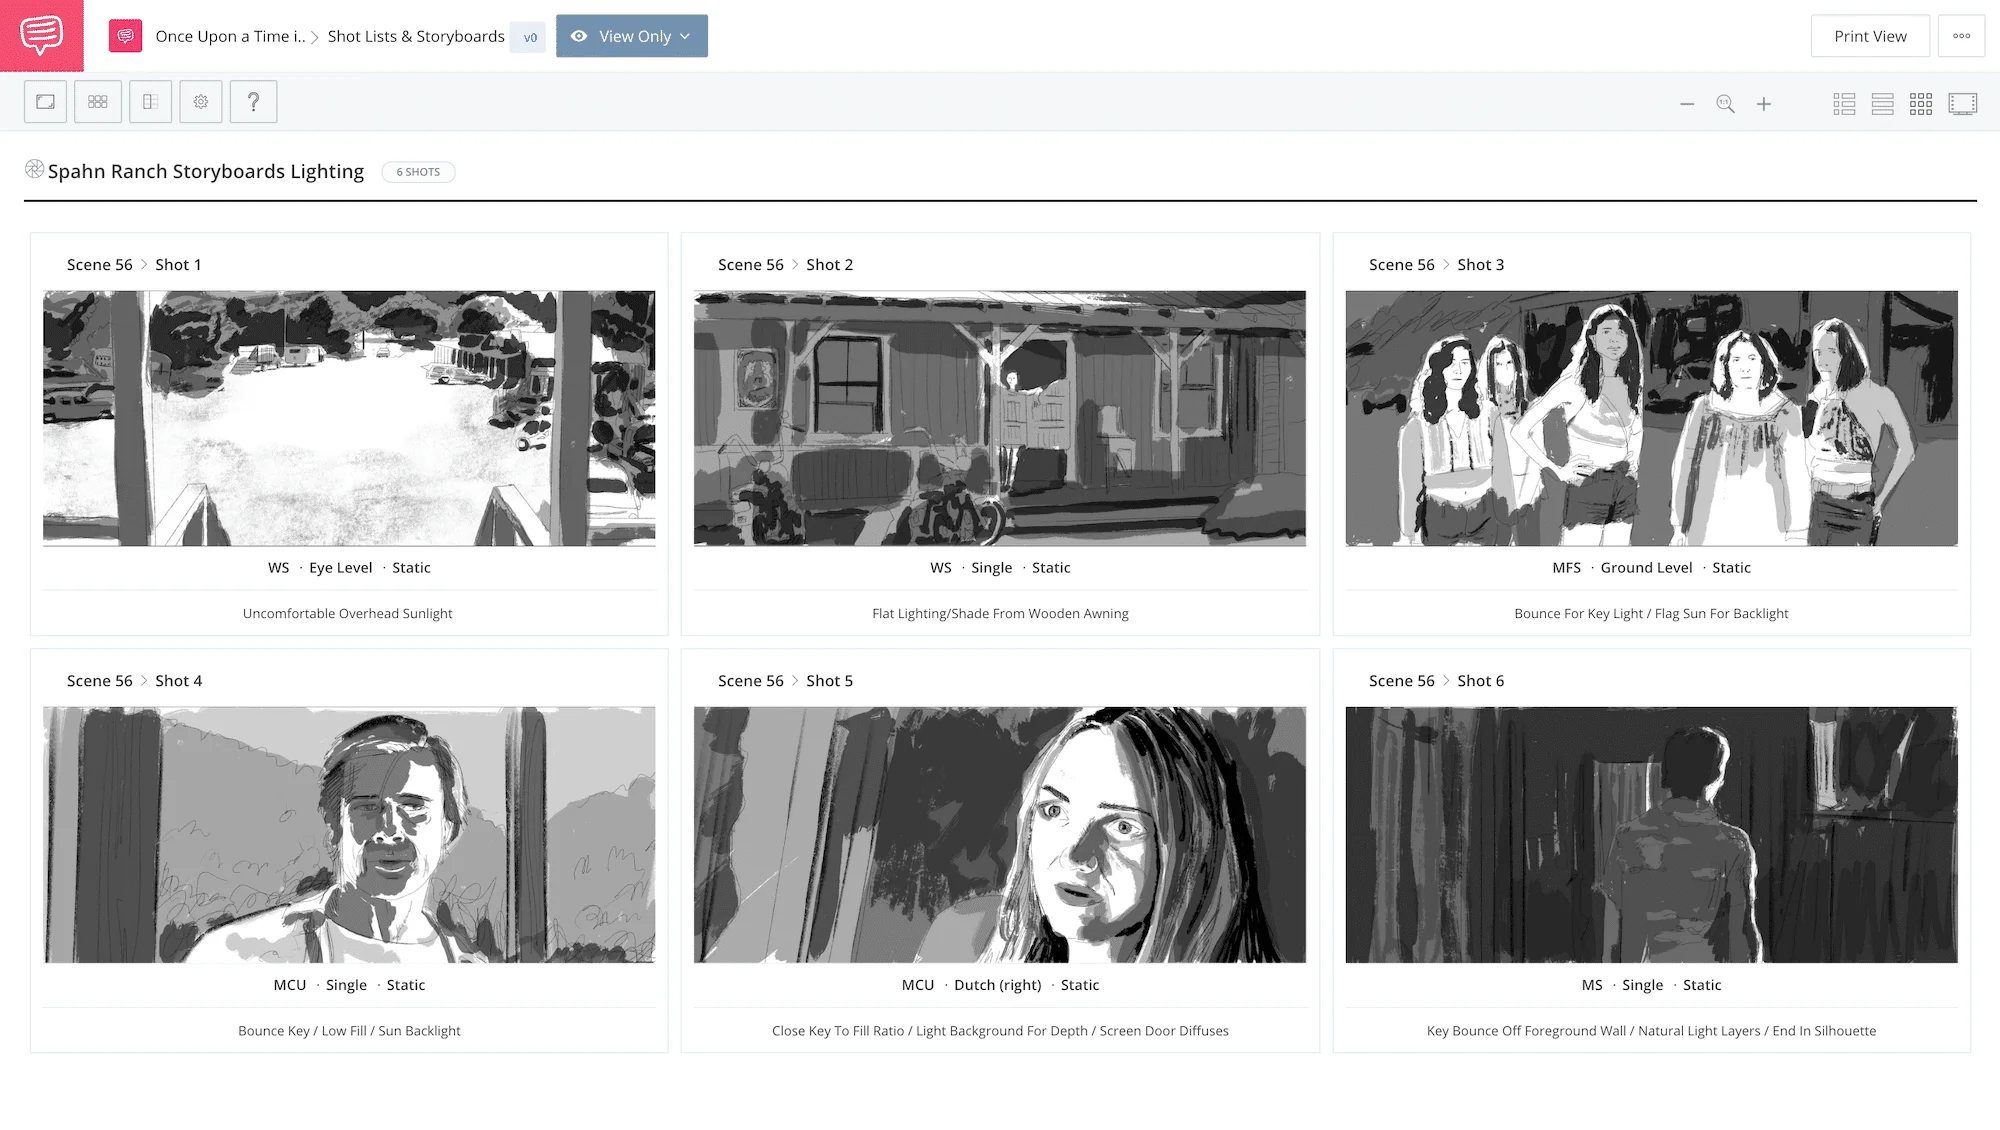
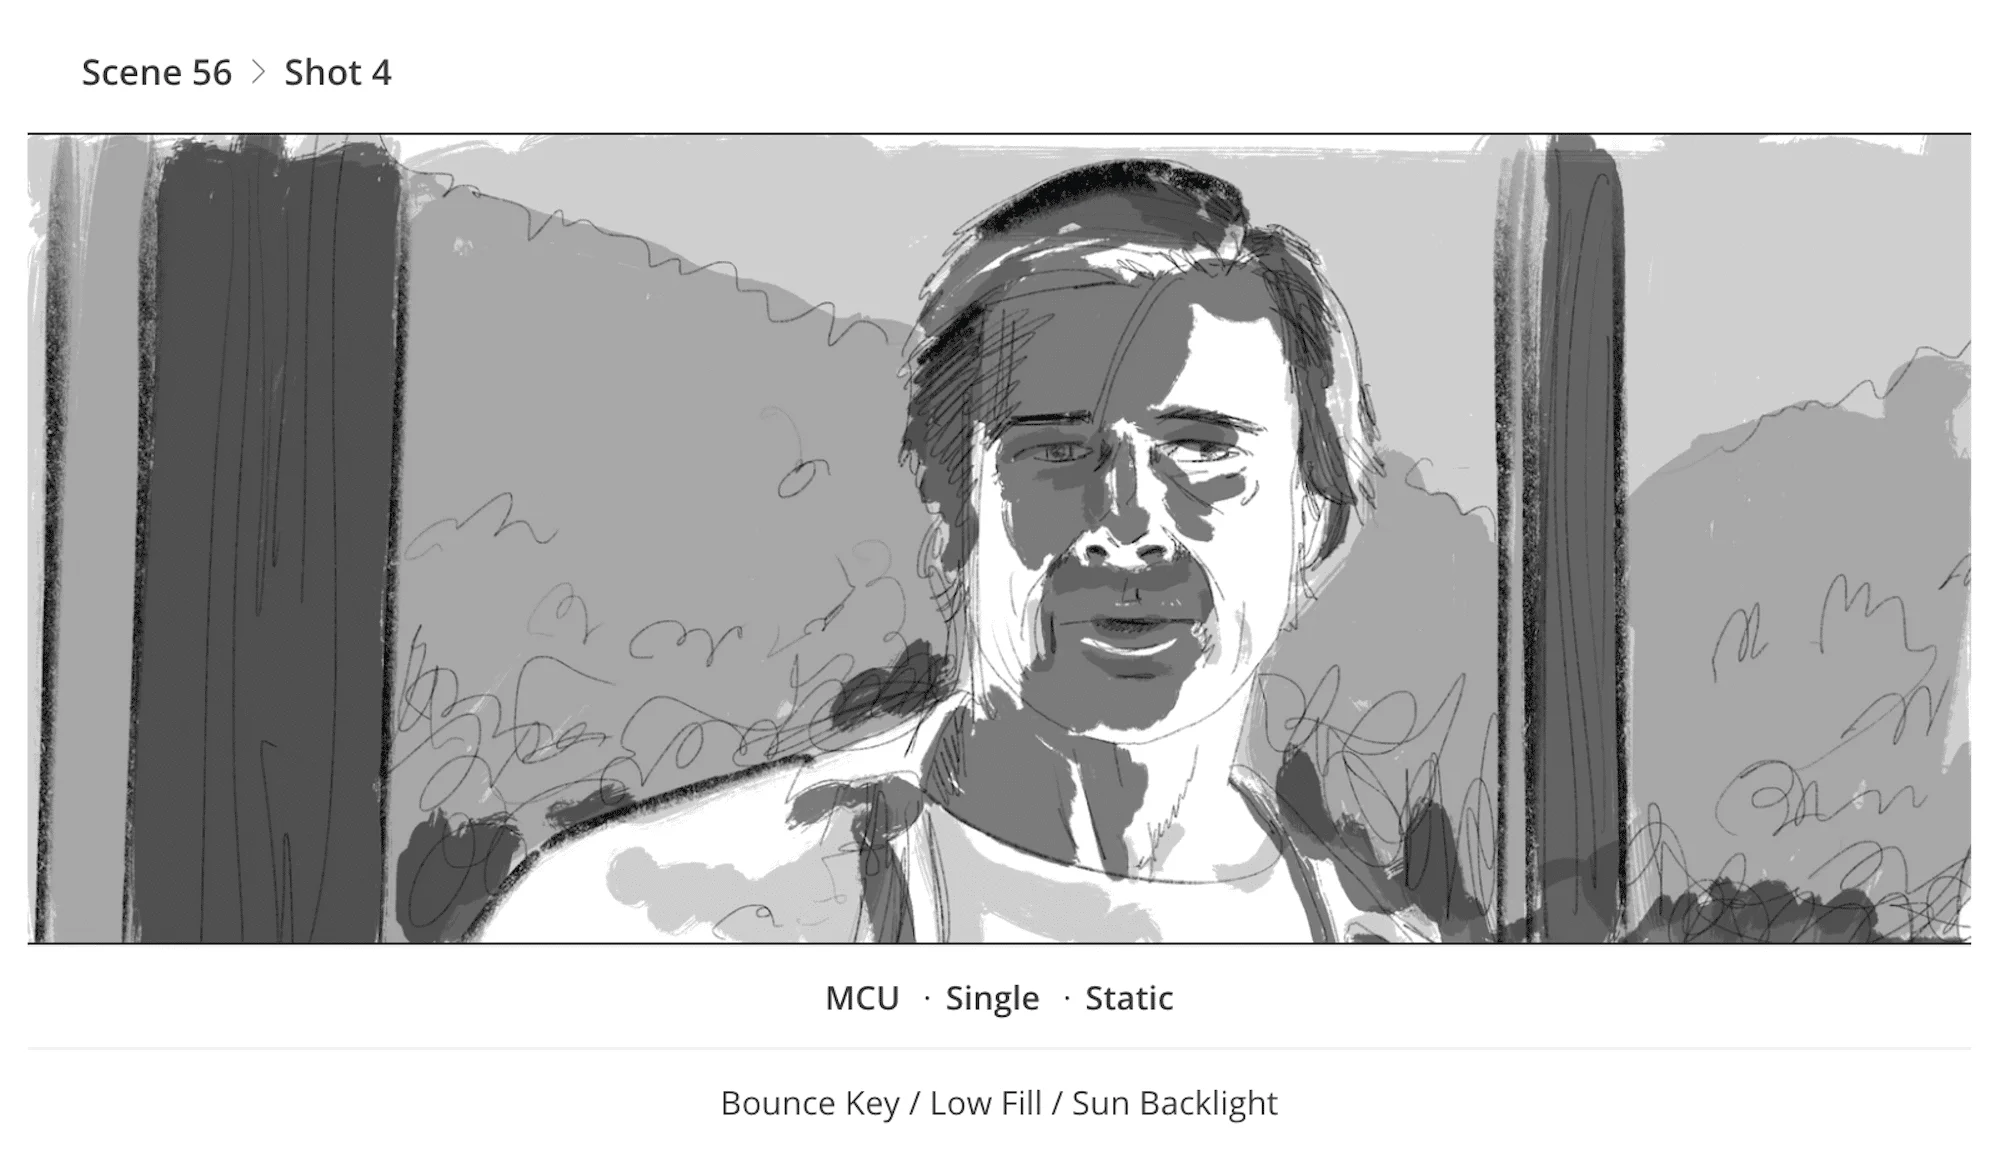
Take a look at how the sun was used as a key light in various shots for this scene from Once Upon a Time in Hollywood:

3 Point Lighting Guide - Once Upon a Time in Hollywood - Scene Storyboard - StudioBinder

Once Upon a Time in Hollywood  •  Shot Listed in StudioBinder

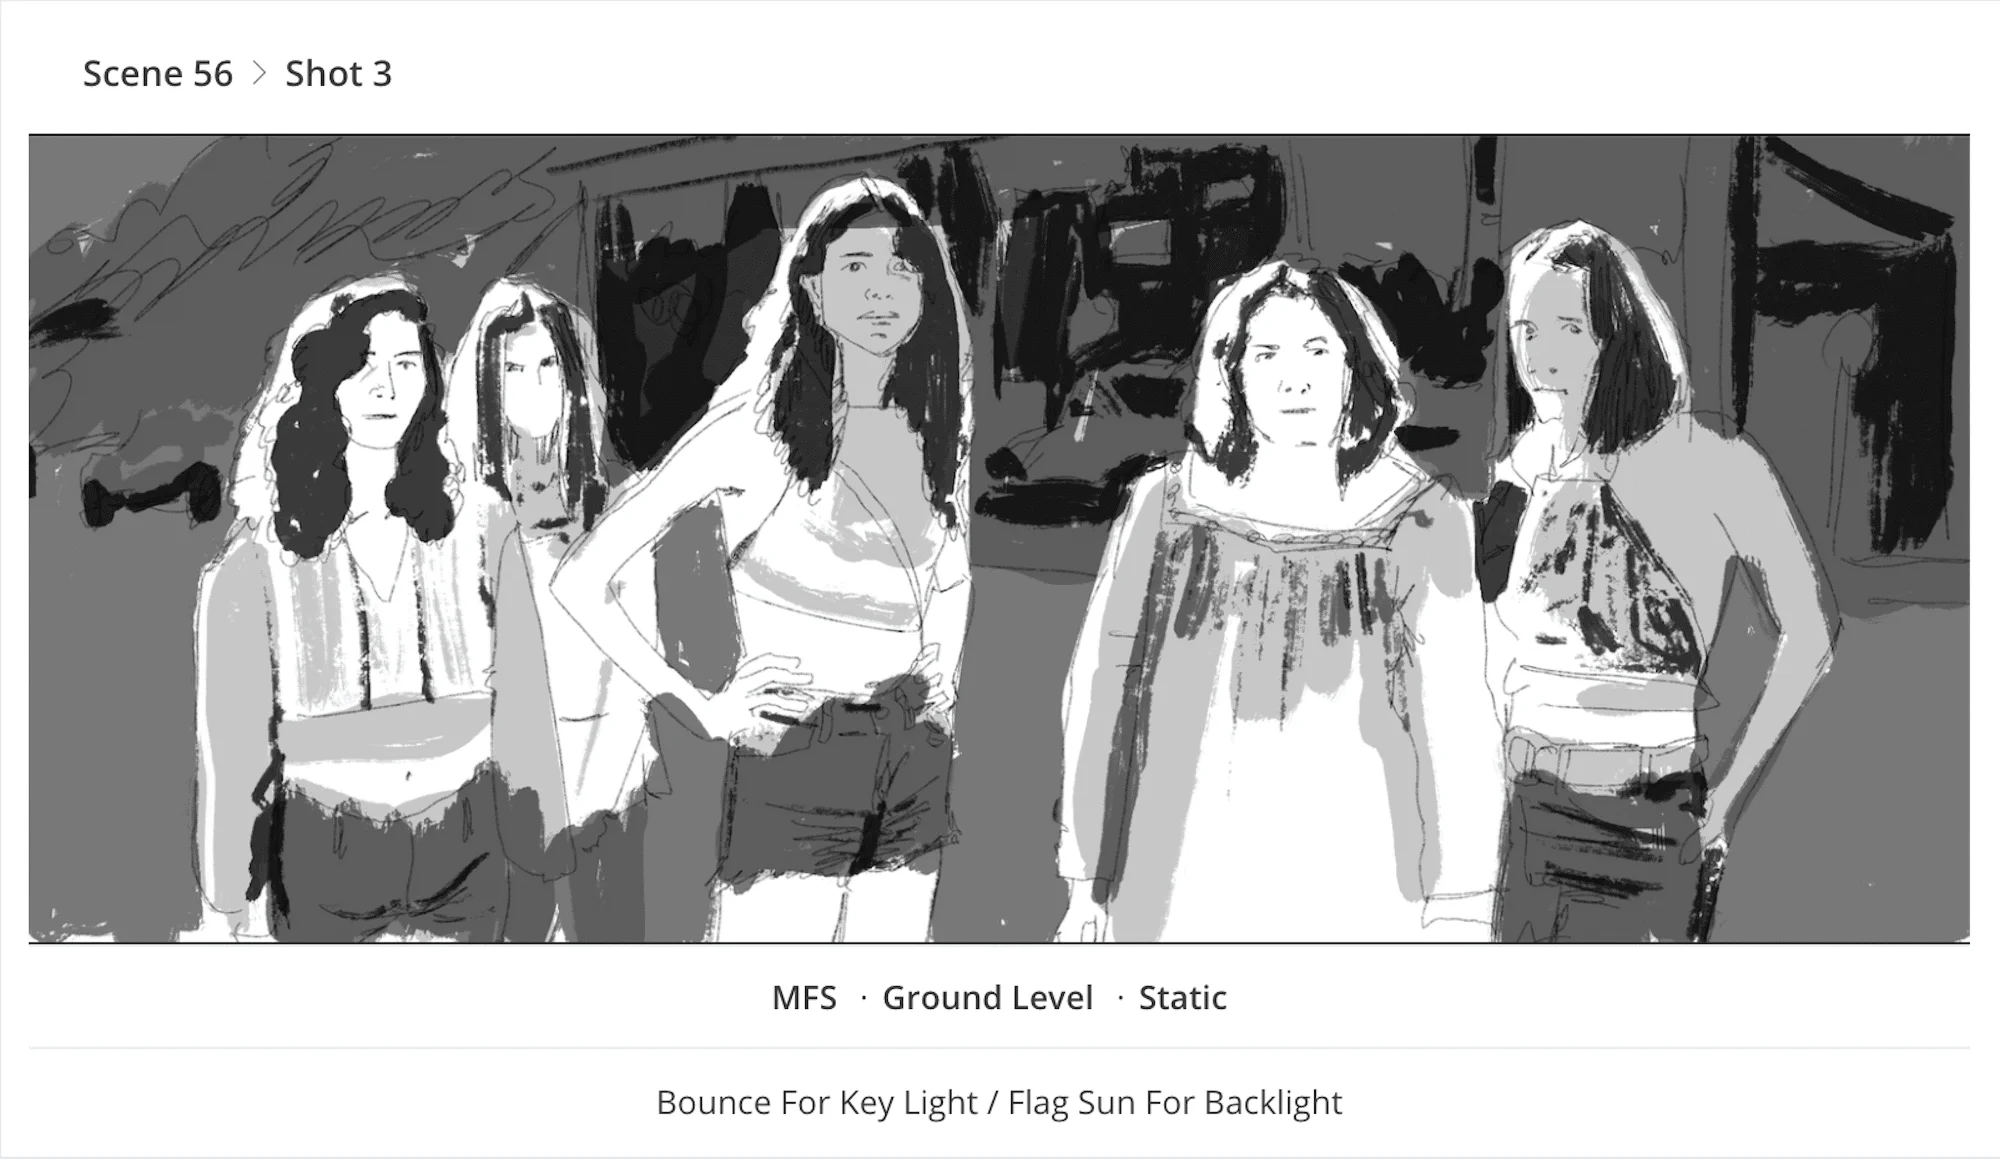
Imagine if you had to create a 3 point lighting setup for shots that had harsh sunlight in the background like this shot:

3 Point Lighting Guide - Once Upon a Time in Hollywood - Hippie Group Storyboard - StudioBinder

Spahn Ranch  •  Shot Listed in StudioBinder

It’s important to note that there are various ways to increase and decrease light intensity, but due to the way light works, each method will have a different overall effect — they’re not interchangeable. 

  • Diffusing the light will decrease the intensity
  • Dimming the light will decrease the intensity 
  • Moving a light further away will decrease the intensity

Each of these methods change light intensity in their own unique ways. You may find yourself in a position where you need less light from a particular source, but simply moving the light further away will have a somewhat adverse effect when compared to, say, diffusing the light.Professional cinematographers will often adjust and incorporate all three methods to get the optimal look for their creative goals, or use objects like homes and awnings to help block light:

light:

3 Point Lighting Guide - Once Upon a Time in Hollywood - Cliff Door Storyboard - StudioBinder

Spahn Ranch  •  Shot Listed in StudioBinder

The most important thing to be said about how to build video lighting setups, including 3 point lighting in film, is that it all depends on your creative goals. If you need a clean and corporate look, you’ll probably want to build a more standard 3 point lighting setup for your video. Your three point lighting setups should always depend on your creative goals.

If you take one light source out of your 3-point lighting setup, you won’t receive the full benefits. Think of it like your favorite recipe for cookies; if you leave out one ingredient, the cookies won’t be perfect.

The look can change based on the ratio of your light sources. If you have a very strong key light, but have a weak fill light, your subject will be unevenly lit — which can be a good for those creepy horror shots.

Want to create a creepy look for a horror film? Why not study some of the best horror films you should see as a fan of the genre. You can still use a three point lighting setup for the dimensional benefits, and adjust the setup (intensity + angle) in a way that still achieves intended look.

How to build a key light setup

A key light is the primary light point for your scene. The key light is most often placed in front of your subject, at an angle, and thus illuminates one section of your subject.

Th key lights angle can range from 15 and 70 degrees, with 45 degrees being most commonly used. For cinematic 3 point lighting, the key light often lands on the front portion of your subject that is faces away from the camera, also commonly referred to as the “smart side”. 

Positioning you key light in this way is by no means required, but it will allow your less intense fill light to favor the camera which, in turn, will give your image a smoother look that is still well lit. 

Take notice of the key light example in the diagram below:

Three Point Lighting - Three Point Lighting Setup - StudioBinder

Key Light Example

Place your key light anywhere you wish. Bounce it off walls or through material, just as long as it hits the front of your subject at an angle. Once you’ve decided where to place your key light setup, you can then accurately determine where to place the fill light and backlight.

FILL LIGHT DEFINITION

How to build afill light setup

A fill light is the second light for your scene, and its purpose is to fill in missing light for your video. It is often placed in front of your subject, opposite to your key light, also at an angle to continue to create some depth, but also to bring out detail in the other side of your subject.

Take notice of the fill light example in the diagram below:

Three Point Lighting - Three Point Lighting Setup - StudioBinder

Fill Light Example

The angle at which you place your fill light does not have to be identical to your key light, but if you are going for an even, polished look for a commercial or interview, you may want to rely on symmetry. 

Angle isn’t everything, because the light intensity matters too.

The fill light intensity is generally suggested at around 50-75% of the intensity of your key light. In many marketing and commercial situations, you should actually go higher like 85-95% so as to get a more even look, but you can also go down to 25-45% to get some really cinematic lighting looks that you would see in narrative filmmaking. 

BACKLIGHT DEFINITION

How to build a backlight setup

A backlight (rim light, or hair light) is the third light for your video lighting setup, and its purpose is to offset the flattening of dimensions caused by your key and fill light. It approaches from behind your subject, often at an angle on the same side as your primary light point. 

You can see a backlight example in the diagram below:

Three Point Lighting - Three Point Lighting Setup - StudioBinder

Backlight Example

The most common placement for your backlight can be achieved by placing it on the same side as your key light, and then moving behind the subject so that the backlight is aimed toward the fill light.

Can 3 point lighting be used for YouTube videos?

What about lighting for YouTube videos? Youtube videos can mean a lot of different things, but if you’re a vlogger or influencer you will generally be recording footage in an interview setting. This is where you can apply three-point lighting techniques with a color-by-numbers approach.

Consider fine tuning your lighting scheme by moving your key light to cast from a different angle, or play with the intensity of your fill light. Often you will want a clean look, but that doesn’t mean a flat look. 

Use your backlight to fix that. Do you have some cool emblem or branding on your wall? Use a set background light to really make it pop. Try out a kicker light to give your face some extra character.

Youtube videos (specifically beauty channels) benefit most from soft light. This means that most of your light is being diffused by some piece of material, or bounced off of some surface so that it evenly coats your subject, rather than crashing down with harsh intensity.

Here’s Sean Cannell from Think Media walking through how to achieve a professional look for your YouTube videos if you’re on a budget.

3 Point Film Lighting Kit

An inexpensive three-point light kit is the Bescor Photon LED 3-Light Kit. This is a bi-color, flicker free LED 3 point lighting system that has a CRI rating of 95, and comes with light stands and plug-in power ability. You can also power these with an NP-F battery.

The fixtures have four barn doors which will allow you to adjust the angle of each light, and because they’re LEDs, they don’t give off uncomfortable heat, and have decent output for the price tag.

If you really want to soften the light, use some diffusion material, or bounce the light against the ceiling and walls. You can use the sun as your key, fill, or backlight and the kit to light the rest of your scene. 

You can also build your own three point lighting setup with lights from our list of professional lighting setups for filmmakers

Blogger-Akash Shinde😍 (Assistant Director)

Student Of journalism and Mass communication.
Different Camera Movements using in Filmmaking.

Types of Camera Movement

MEANING THROUGH MOTION
  1. Static / Fixed Shot
  2. Dolly Shot
  3. Zoom Shot
  4. Dolly Zoom Shot
  5. Pan Shot
  6. Tilt Shot
  7. Whip Pan Shot 
  8. Whip Tilt Shot
  9. Tracking Shot
  10. Crab Shot
  11. Arc Shot

The way a camera moves can give meaning to what’s happening on screen. You can burst into a room, drone over from on high, pan with a head turn, and dolly-zoom for any revelation. 

What is camera movement?

Camera movement is a powerful filmmaking tool employed to modify the relationship between the subject and the camera frame, with the goal of altering viewer’s perspective of space and time for a more impactful and visceral visual storytelling.

Camera moves set auteur directors out from the pack and wind up defining their visual style. But how can you plan all these camera movements so your story stays consistent from scene to scene?  

Static Shot or Fixed Shot

When there’s no movement (i.e. locked camera aim) it’s called a static shot. These camera shots emphasize the appearance and movement of your subject against its environment, and are predominantly captured by being placed on a tripod or a dolly that remains static during the shot. 

Static shots work well in every genre, but they’re nice for comedy because the actor’s performance and dialogue is often the focus.

Camera Dolly Shot 

dolly shot is where the camera is affixed to a mechanism called a dolly, which is a specialized push-cart built to handle heavy cinema cameras. A dolly will often have areas to attach seats for the camera operator and assistant camera operators to pull focus and control the camera.A dolly most commonly will be placed on tracks, and the vast majority of professional dollies have either a hydraulic or even a pneumatic head that can jib up and down during operation. 

Zoom Lens Shot

Zoom shots are camera shots that change the focal length of the lens during the shot. This action can be a zoom out, or a zoom in, but they are different from a push in (or dolly in) because the camera is rarely changing positions, but simply altering the focal length of the zoom lens.

A good way to remember this is that the camera does not zoom, but rather the lens zooms. Now, your iPhone might be able to do a “digital zoom” which is actually just reducing the image quality by moving in on an already captured image which is a huge faux pas in pro filmmaking.

Dolly/Zoom Shot or Vertigo Shot

dolly/zoom shot is where the camera position and focal length of the lens are simultaneously altered to create a warping effect. 

Camera Pan Shot

Camera pans rotates the camera side to side on a horizontal axis. This can reveal something to your viewer or allow them to follow an action.

Camera Tilt Shot

camera tilt is when you move your camera up and down on a vertical axis. So, it’s exactly like a pan, only vertical.

Whip Pan Shot or Swish Pan Shot

whip pan happens when you pan the camera from one shot to another, creating a motion blur. 

Whip Tilt Shot or Swish Tilt Shot

The swish tilt is the same idea as a swish pan, only vertical.

Tracking Shot

tracking shot moves with your subject. Sometimes it follows behind or beside them on a dolly, Steadicam or a gimbal.

Crab Shots

The crab shot is basically a dolly shot that moves horizontally like a crab.

Arc Shot

Arc shots are camera shots where the camera moves around the subject in an arc pattern so as to show more of the surroundings:

Blogger-Akash Shinde😍 (Assistant Director)

Student of journalism and mass communication.

Different Camera angle using in filmmaking.


Types of Camera Shot Angles

ADJUSTING CAMERA HEIGHT FOR IMPACT
  1. Eye Level Shot
  2. Low Angle Shot
  3. High Angle Shot
  4. Hip Level Shot
  5. Knee Level Shot
  6. Ground Level Shot
  7. Shoulder-Level Shot
  8. Dutch Angle Shot
  9. Birds-Eye-View Shot / Overhead Shot
  10. Aerial Shot / Helicopter Shot

It’s not enough to just understand shot size. Camera angles, and degree of those angles, can totally change the meaning of a film shot.

What is camera shot angle?

The camera shot angle is used to specify the location where the camera is placed to take a shot. The position of the camera in relation to the subjects can affect the way the viewer perceives the scene. A scene may be shot simultaneously from multiple camera angles to amplify effect on emotions.There are many camera angles at a filmmaker’s disposal and can even be combined for additional effect. Here’s a rundown of every camera angle, how they work, and whey they might work best in your next shot list.For a downloadable “cheatsheet,” here is a shot list with the different types of camera shot angles:

Eye Level Shot

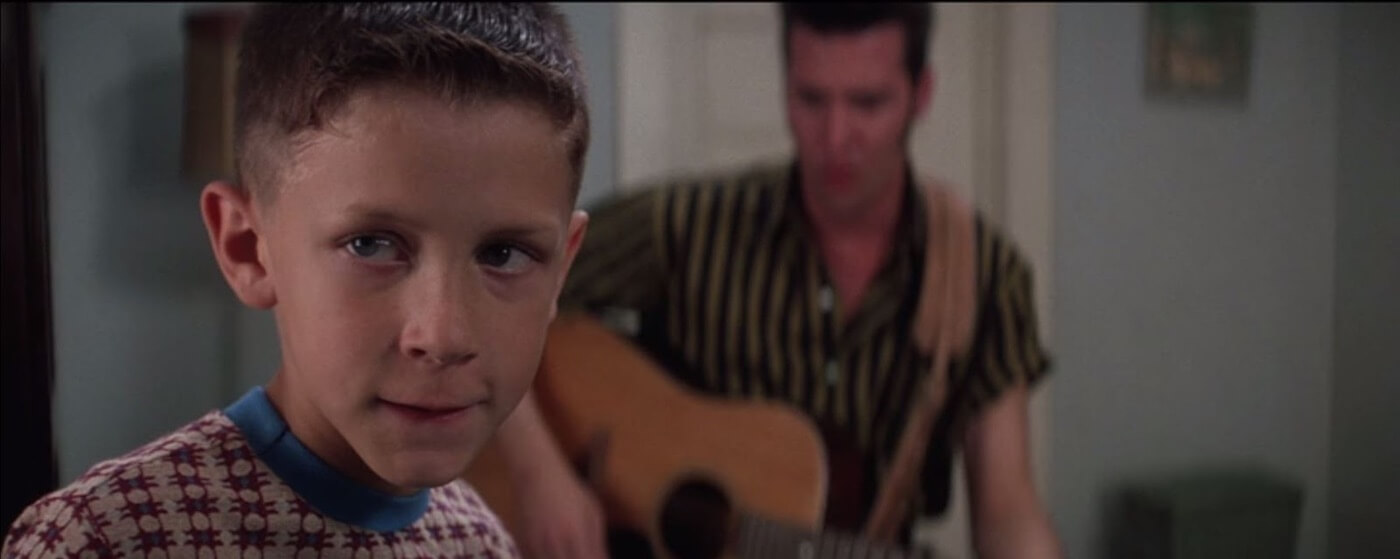
First, consider the most common height: the eye level shot. When your subject is at eye-level they’re in a neutral perspective (not superior or inferior). This mimics how we see people in real life — our eye line connecting with theirs.

Ultimate Guide To Camera Shots - An Eye Level Close Up Of Young Forrest Gump

Types of Angles: Eye Level Shot Example in Forrest Gump

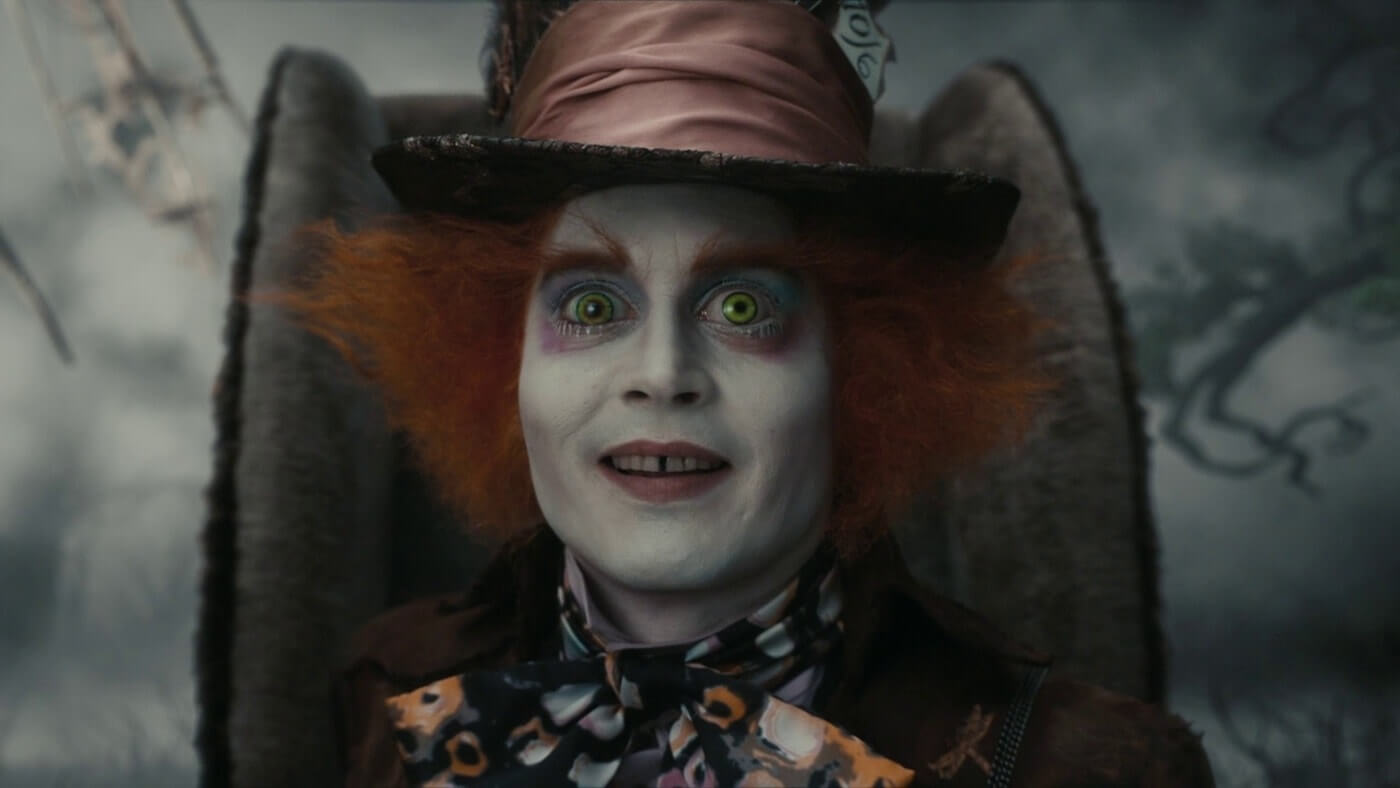
Here’s another eye level shot example from one of the best Tim Burton movies Alice in Wonderland:

Ultimate Guide To Camera Shots - An Eye Level Close Up On The Mad Hatter

Types of Camera Shot Angles: Eye Level Shot Example in Alice in Wonderland.

Low Angle Shot

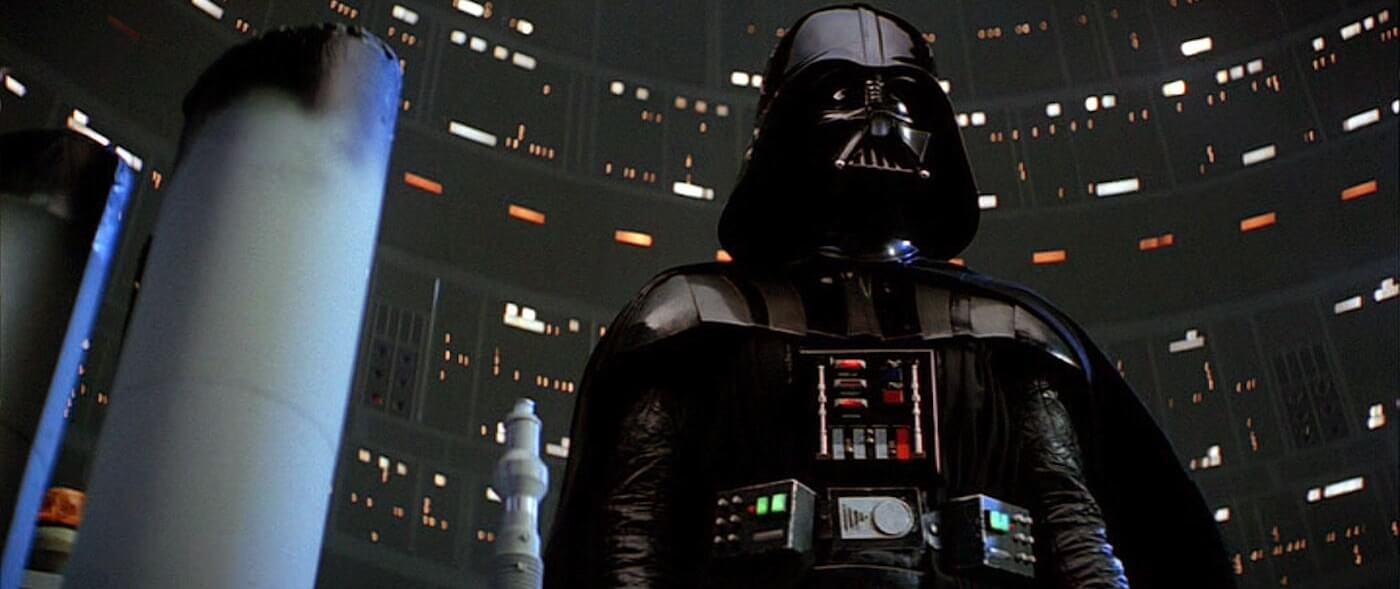
low angle shot frames the subject from a low camera height looking up at them. These camera shots most often emphasize power dynamics between characters.

superior character with the upper hand is often framed from down low. This makes an inferior feel like they are looking up to them.

The Ultimate Guide To Camera Shots - A Threatening Low Angle Of Darth Vader In Star Wars The Empire Strikes Back
Low angle

High Angle Shot

In a high angle shot, the camera points down at your subject. It usually creates a feeling of inferiority, or “looking down” on your subject.

But, as the video below shows, there are creative expressions of this type of angle that can vary depending its context.

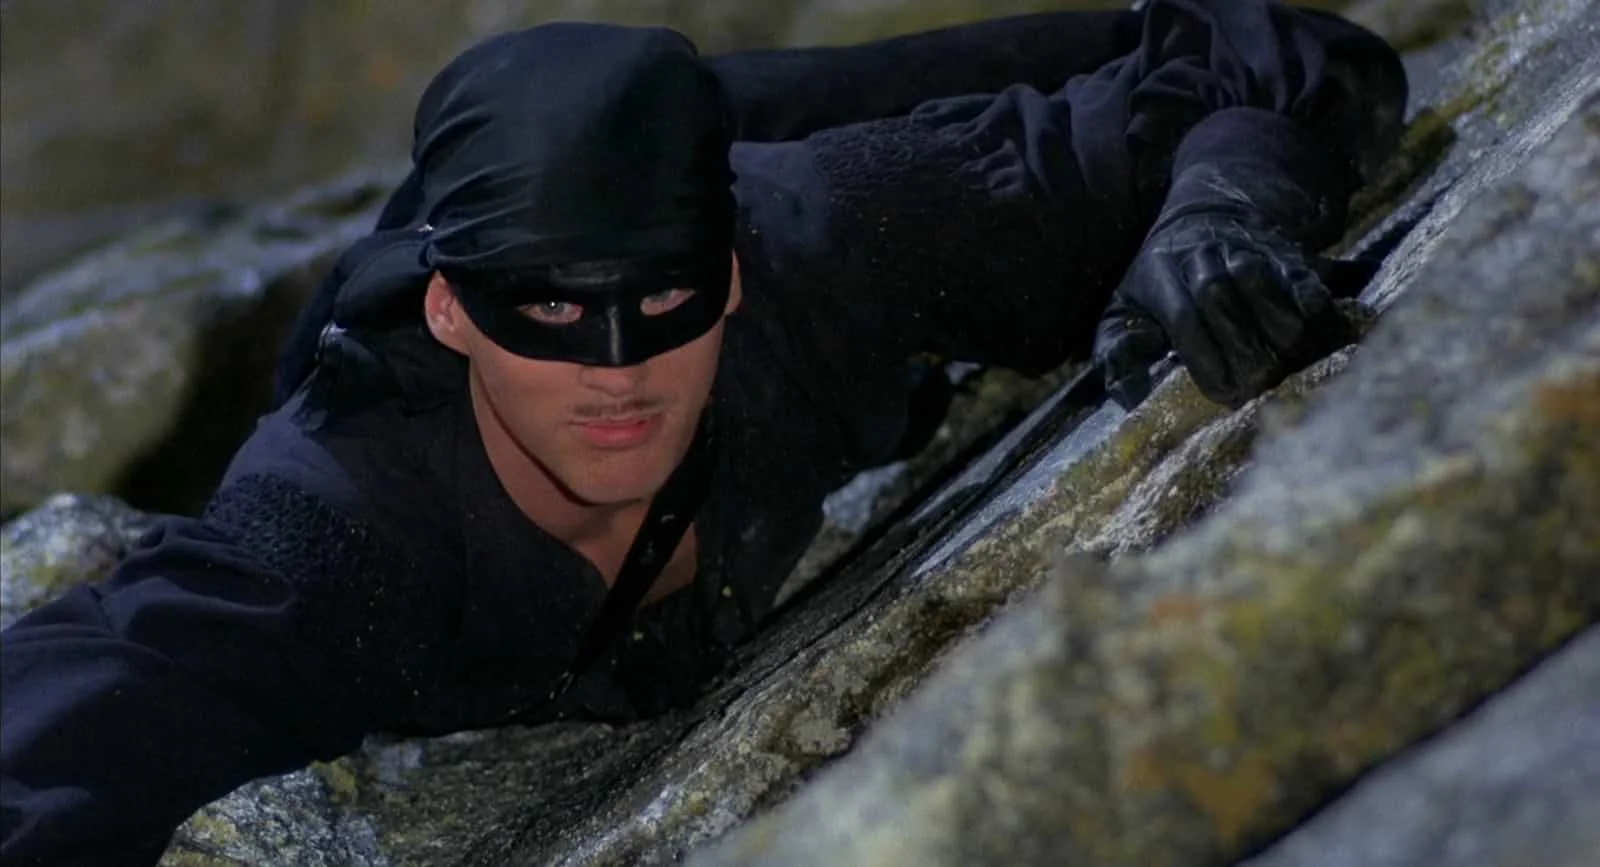
Here’s an example of a high angle shot from one of the best romantic movies The Princess Bride:

High Angle Shot - Camera Angles - Princess Bride High Angle

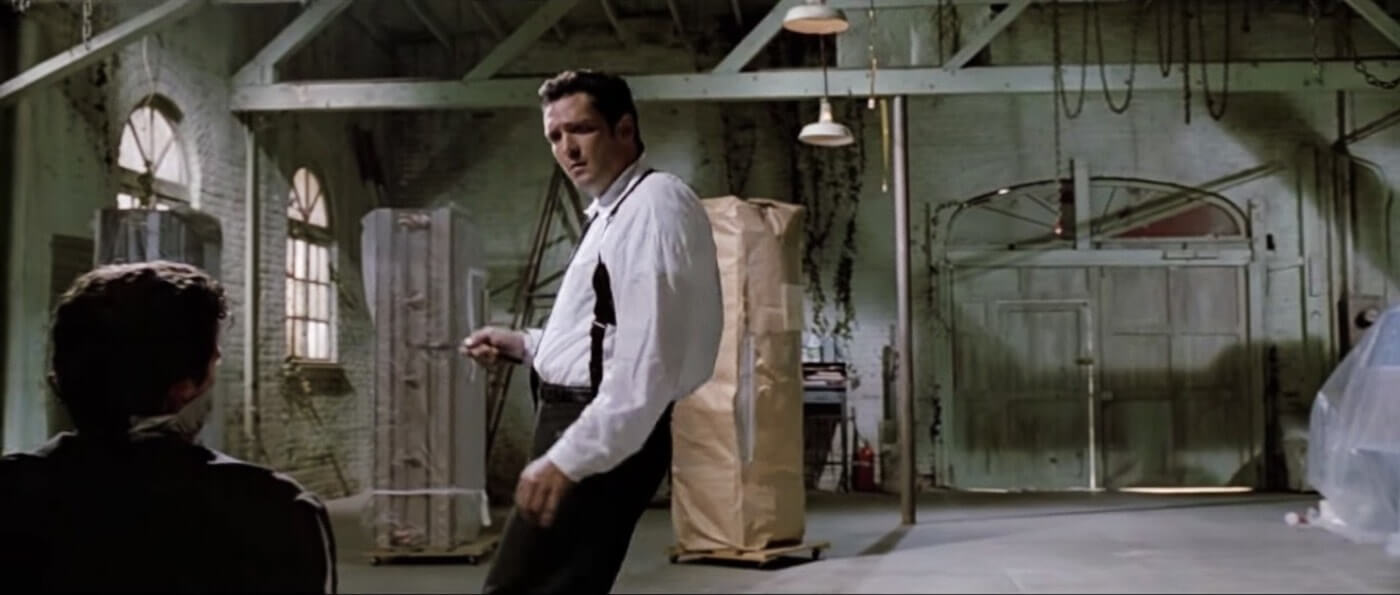
Hip Level Shot

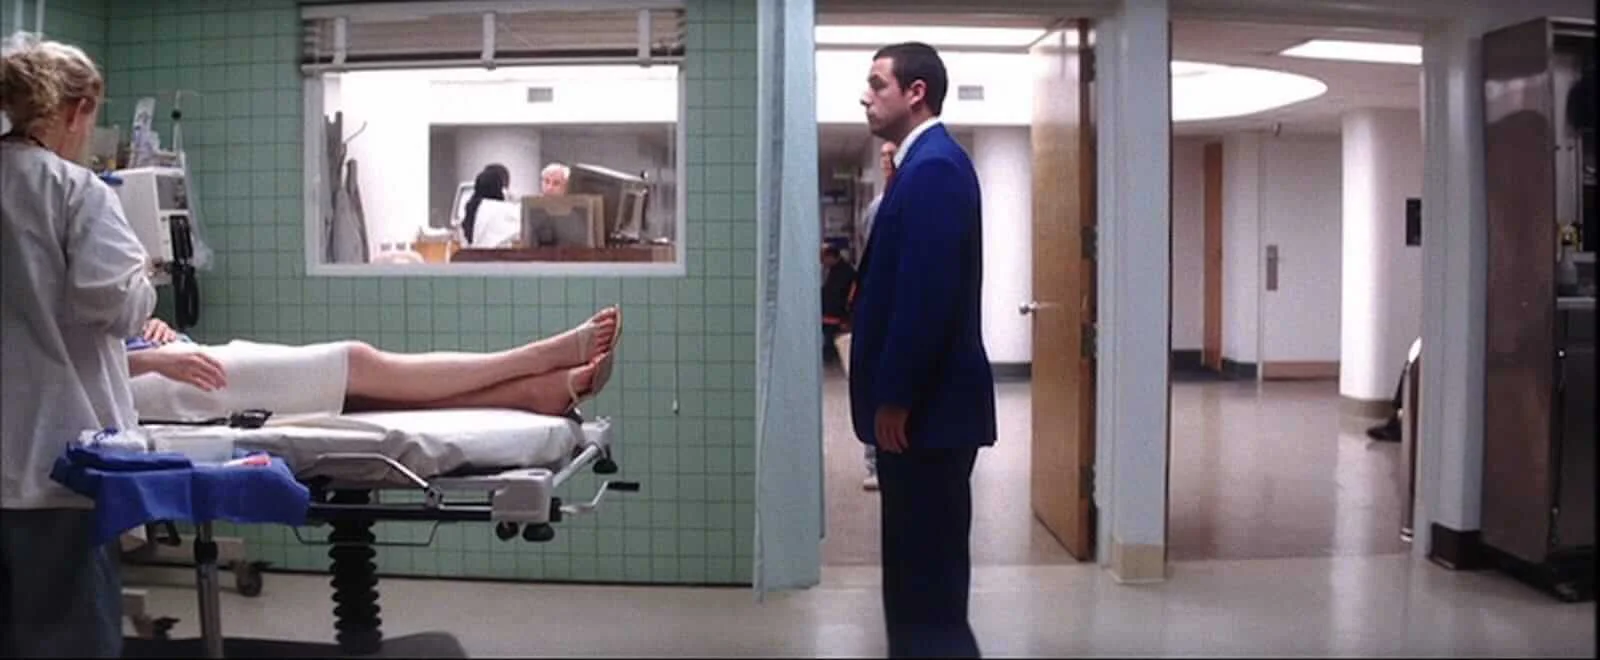
hip level shot is when your camera is roughly waist-high.

Ultimate Guide To Camera Shots - Michael Madsen Framed In A Hip Level Over The Shoulder Shot For Reservoir Dogs

Types of Camera Angles: Hip Level Shot Example in Reservoir Dogs

Here’s another hip level shot example from one of the best romantic comedies Punch-Drunk Love:

Hip-Level-Shot-Punch-Drunk-Love-StudioBinder
Hip level camera Angle.

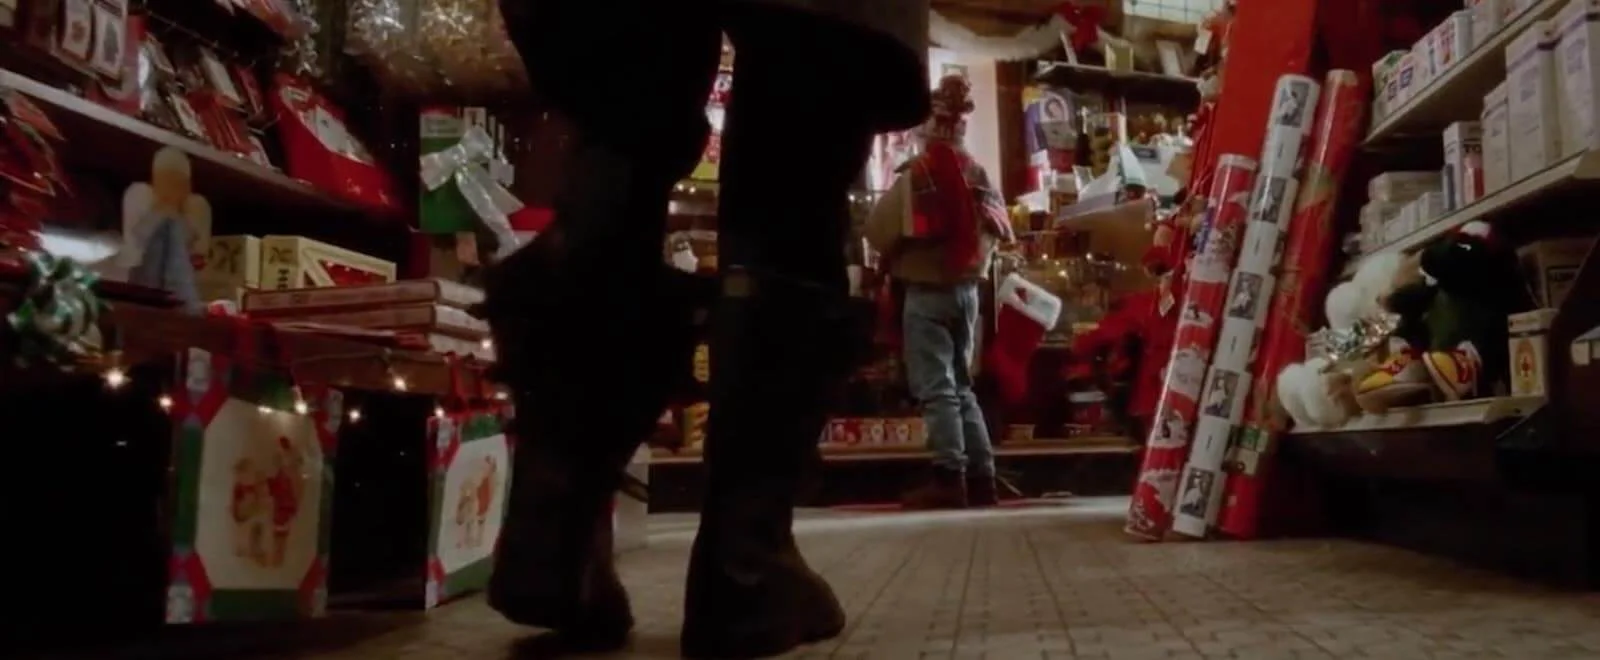
Knee Level Shot

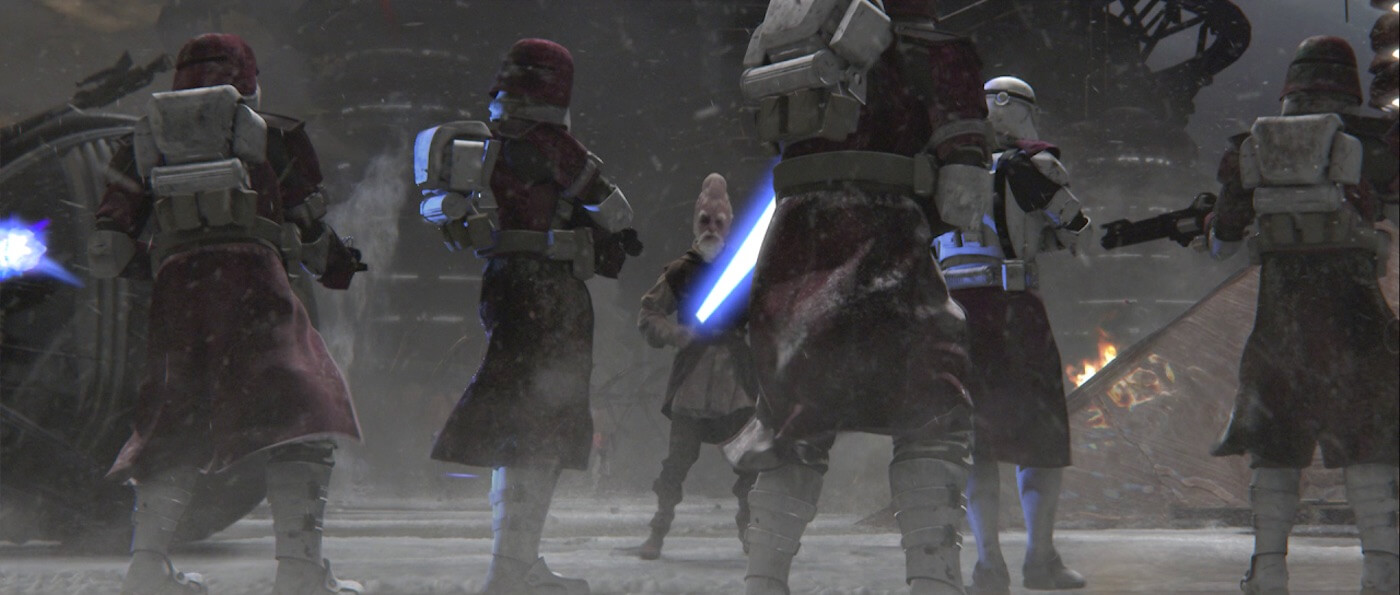
This is when your camera height is about as low as your subject’s knees. They can emphasize a character’s superiority, if paired with a low angle.

Knee-Level-Shot-Home-Alone-StudioBinder
Knee level camera angles

Here’s another knee level shot example:

Ultimate Guide To Camera Shots - A Knee Level Shot From Star Wars Episode III Revenge Of The Sith
Knee level

Ground Level Shot

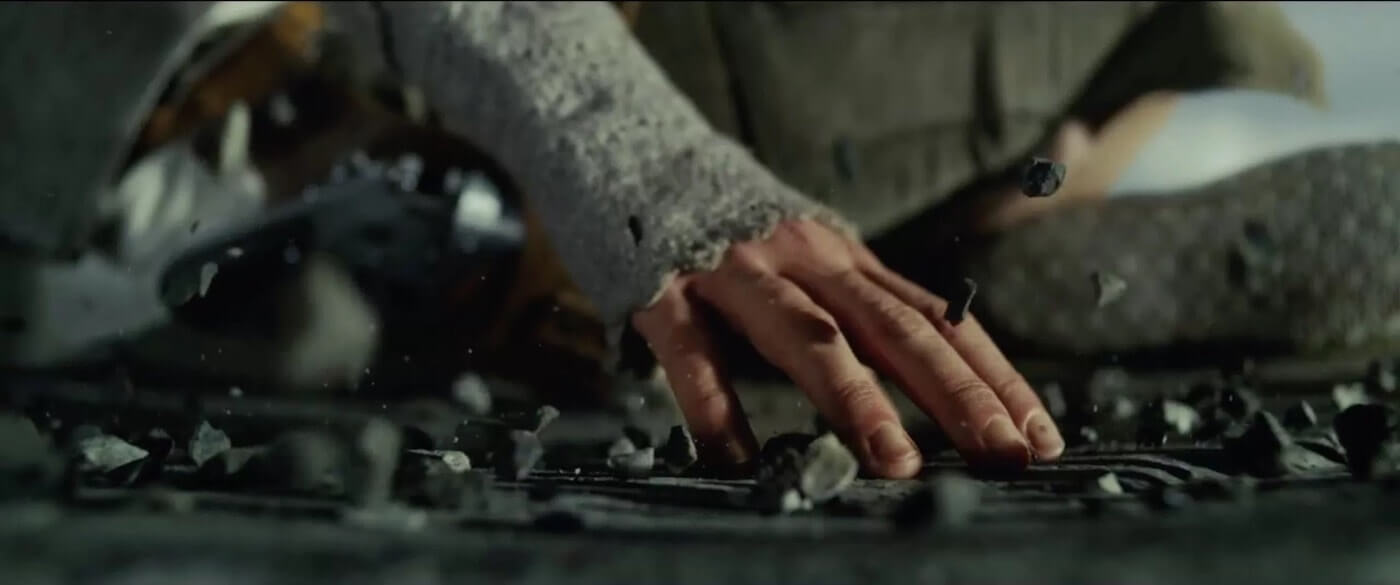
A ground level shot is when your camera’s height is on ground level with your subject. Needless to say, this shot captures what’s going on the ground your subject stands on.

Ultimate Guide To Camera Shots - A Ground Level Close Up From Star Wars The Last Jedi

Types of Angles: Ground Level Shot Example in Star Wars VIII: The Last Jedi

Here’s another ground level shot example:

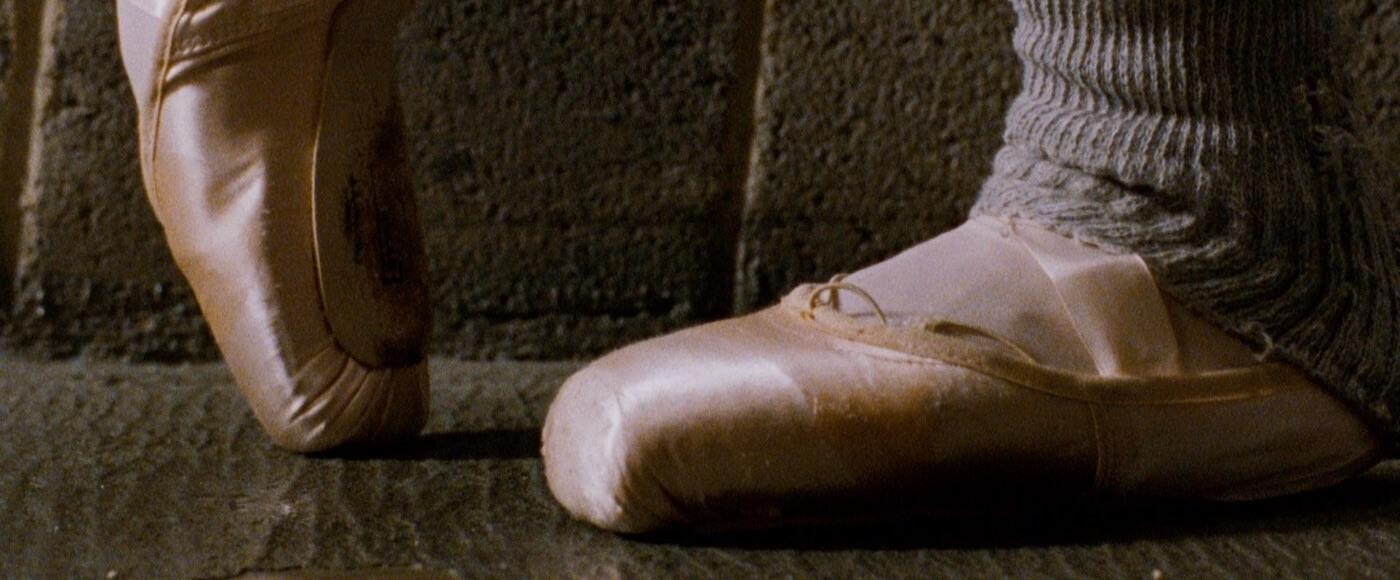
Ultimate Guide To Camera Shots - A Ground Level Close Up In Black Swan

Shot Types: Ground Level Shot Example in Black Swan

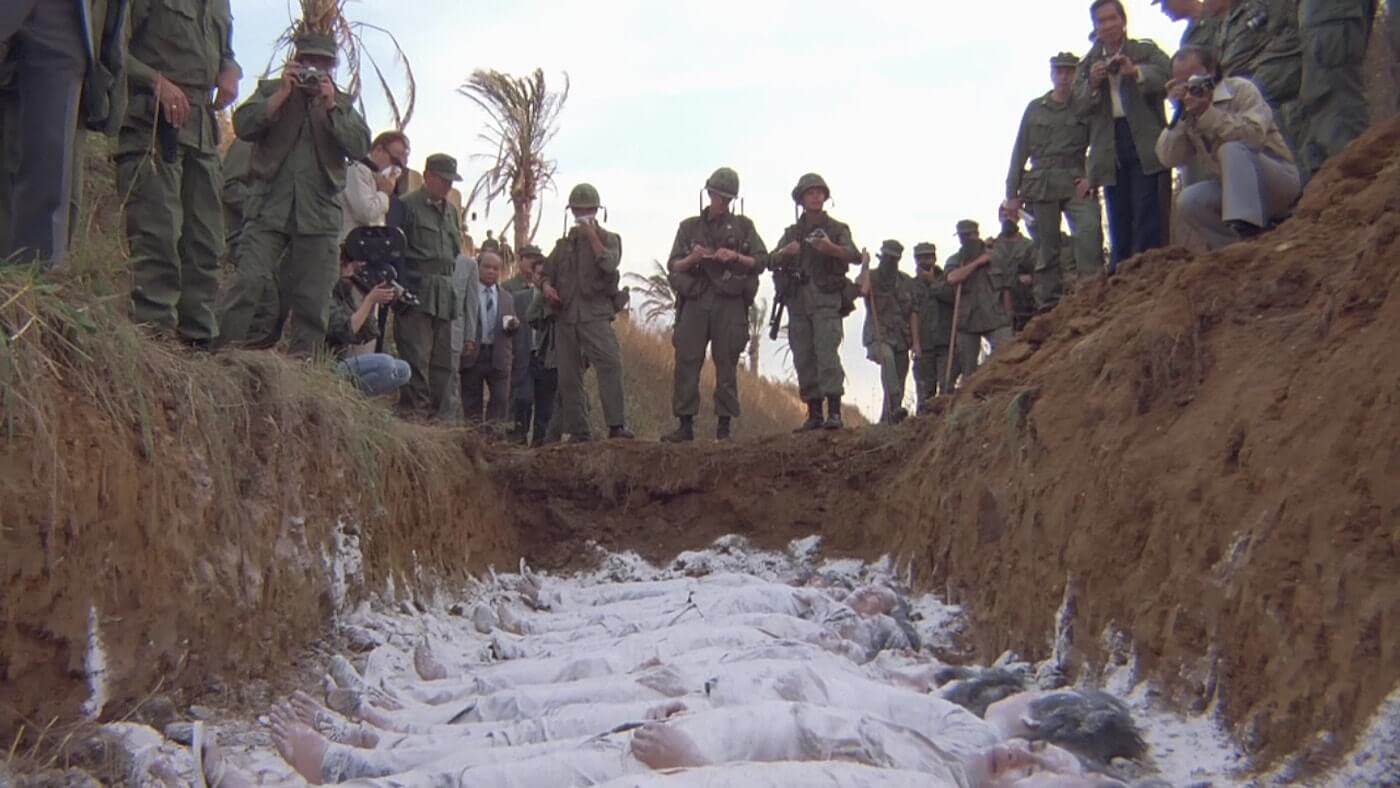
Here’s another ground level shot example from one of many Stanley Kubrick’s marvelous movie

Metal Jacket:

Ultimate Guide To Camera Shots - A Chilling Ground Level Zoom Shot From Full Metal Jacket
Knee level.

Shoulder Level Shot

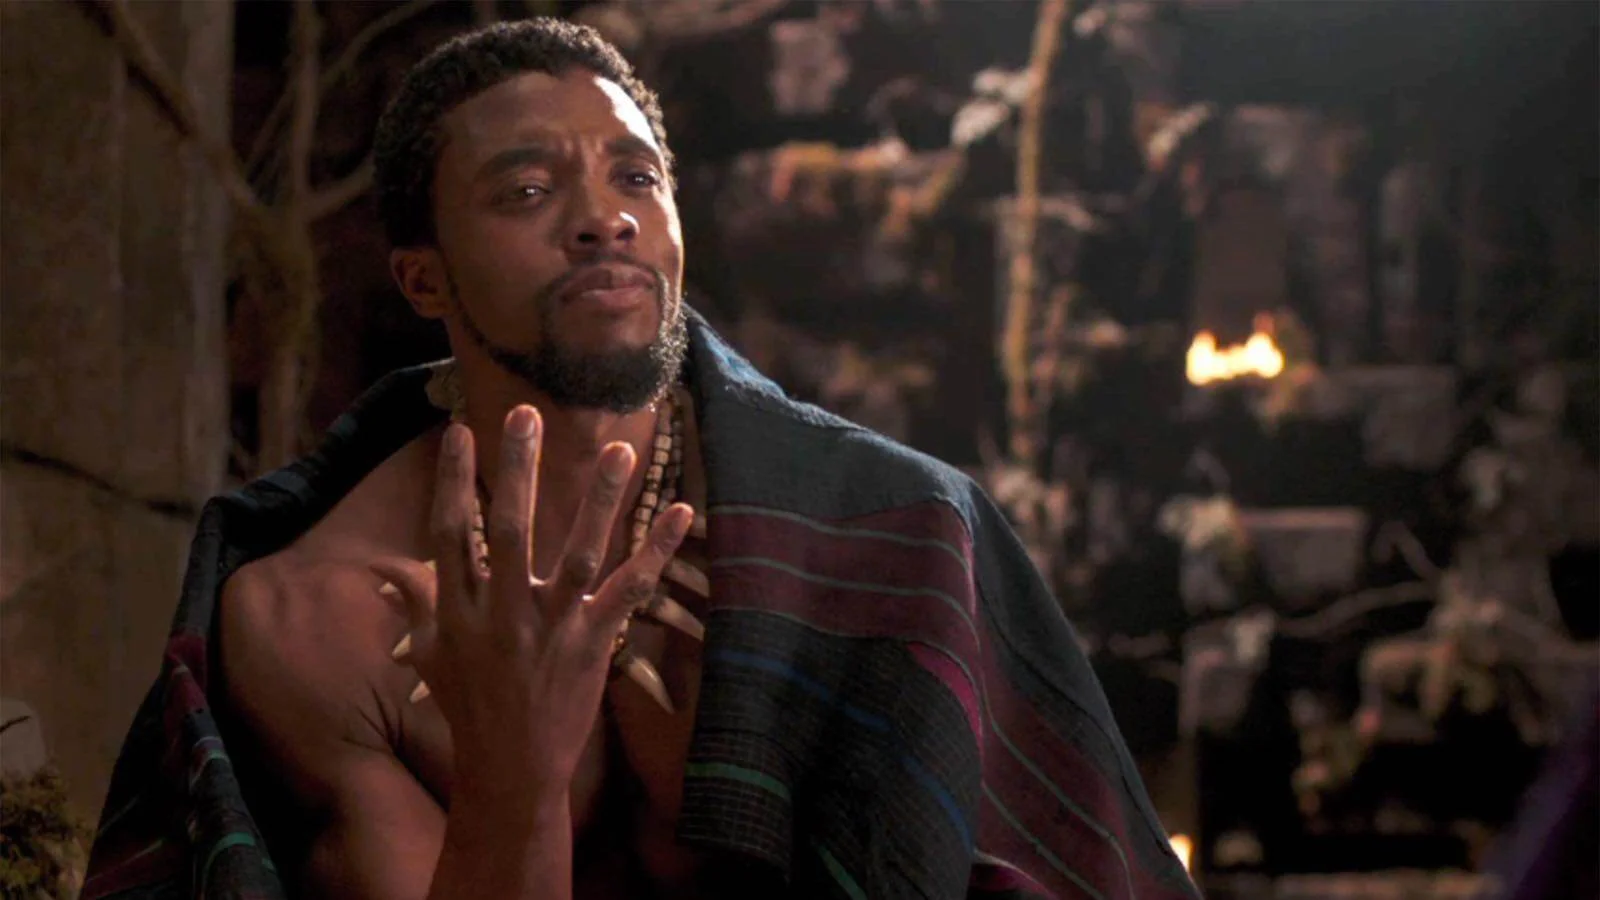
This is when your camera is roughly as high as your subject’s shoulders. Shoulder level shots are actually much more standard than an eye level shot, which can make your actor seem shorter than reality:

Three Point Lighting - Black Panther - StudioBinder

Types of Camera Shot Angles: Shoulder Level Shot in Black Panther

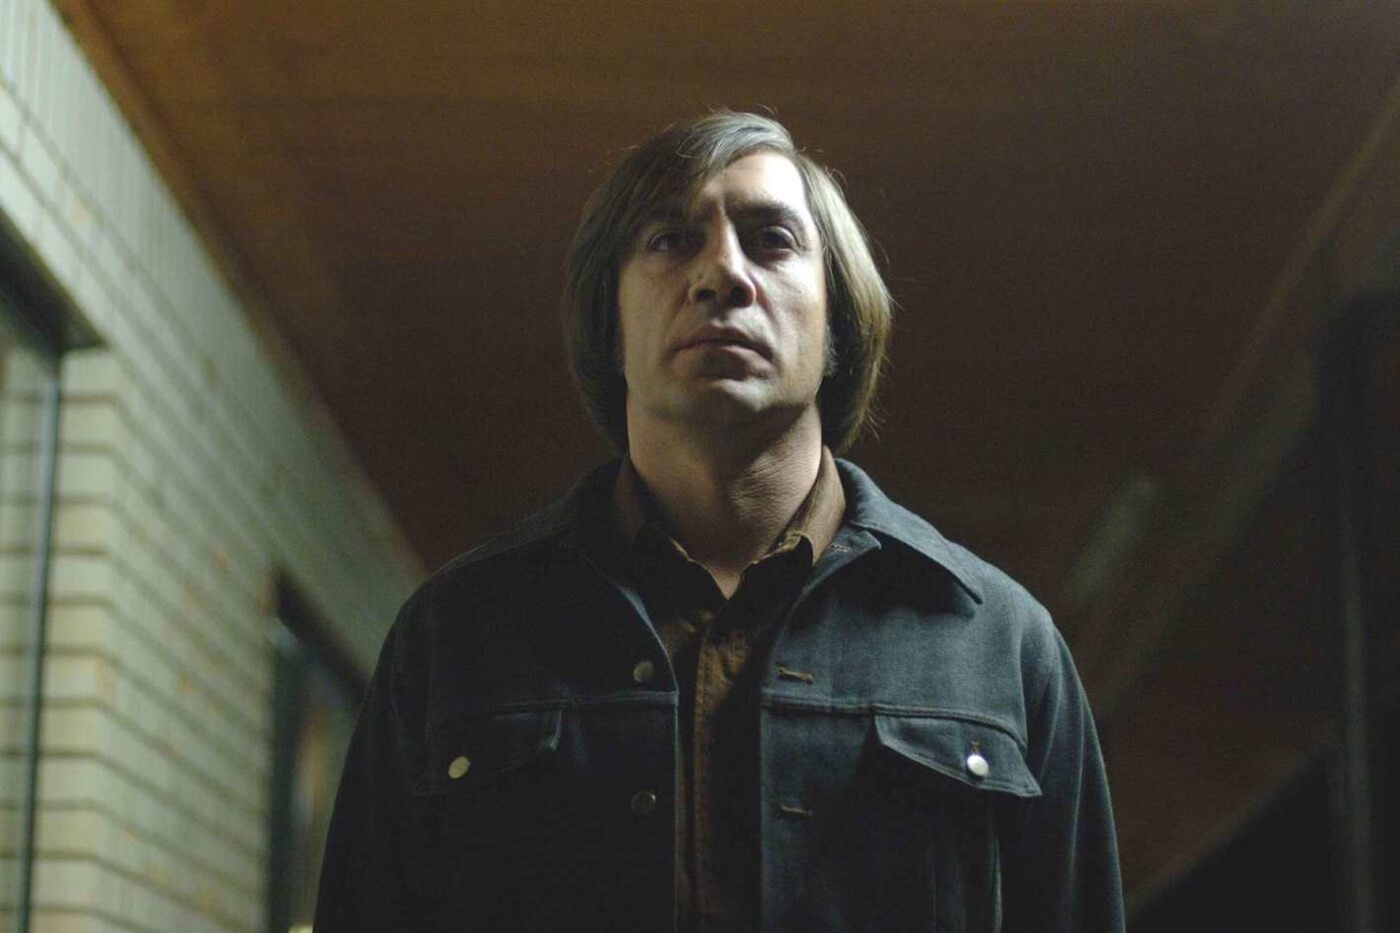
A shoulder level shot can maximize the feeling of superiority when paired with a low angle. Here’s another shoulder level shot example:

Ultimate Guide To Camera Shots - A Low Angle Shoulder Level Shot From No Country For Old Men

Types of Camera Angles: Shoulder Level Shot Example in No Country For.

Dutch Angle or Dutch Tilt Shot

For a dutch angle (dutch tilt), the camera is slanted to one side. With the horizon lines tilted in this way, you can create a sense of disorientation. This video breaks down a key moment in Mission: Impossible when Ethan first realizes that he’s being set up.

Bird’s Eye View Shot or Overhead Shot 

An overhead shot is from way up high, looking down on your subject and a good amount of the scenery surrounding him or her. This can create a great sense of scale and movement.

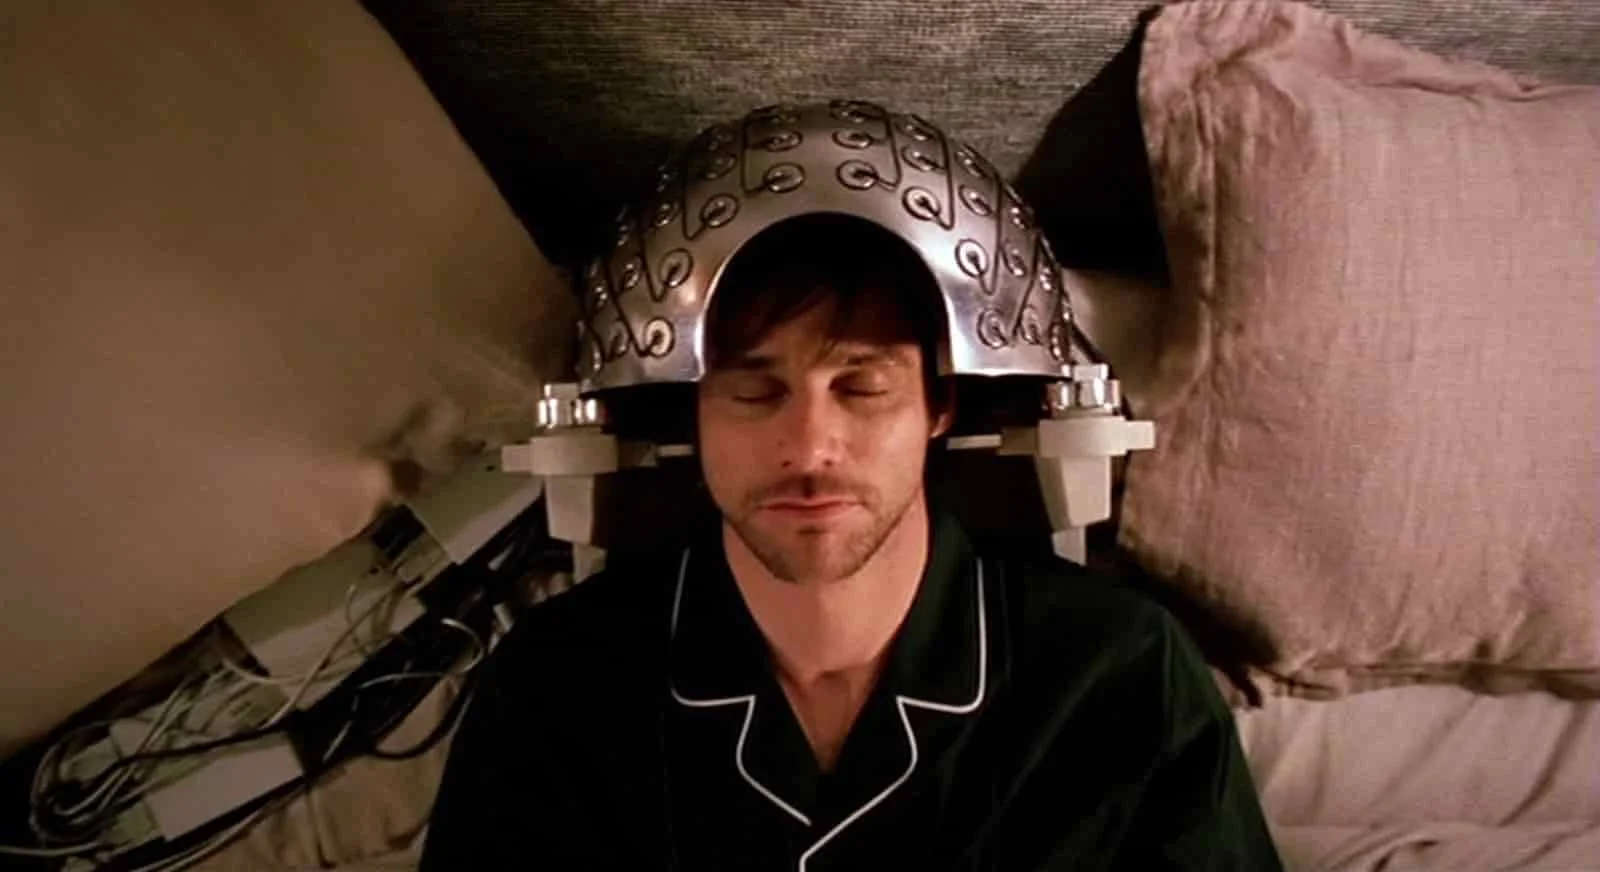
Here’s an overhead shot example:

Aerial Shot - Camera Angles - Eternal Sunshine overhead shot
Bird veis or overhead shot

Aerial Shot

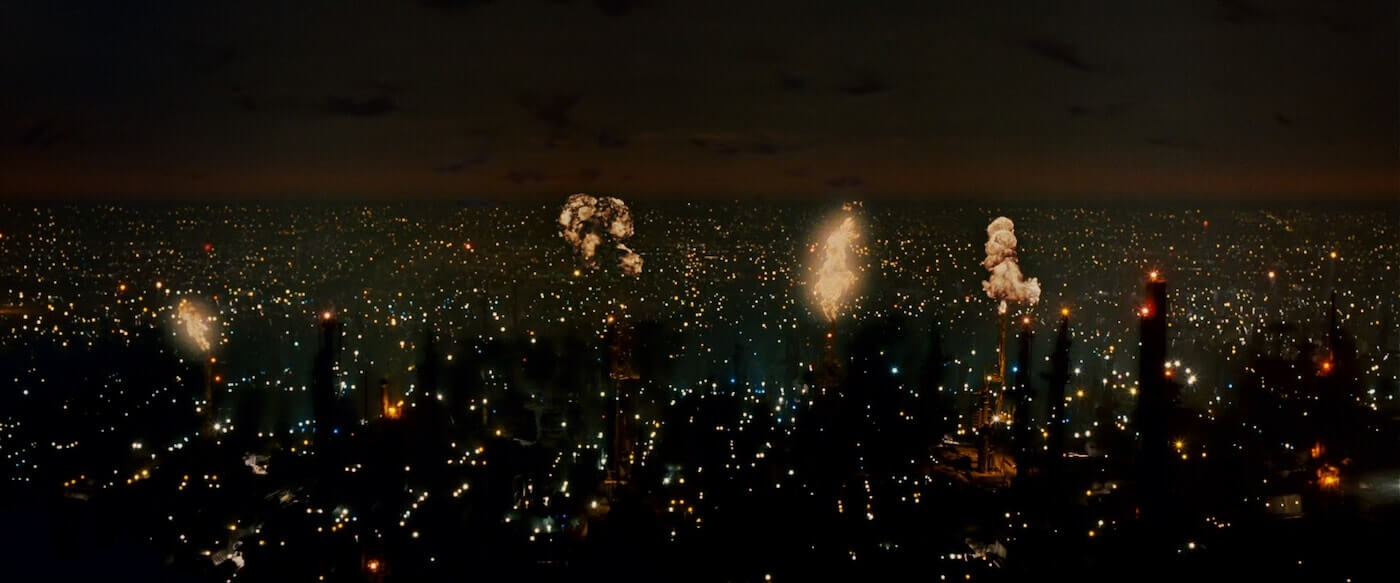
Whether taken from a helicopter or drone, this is a shot from way up high. It establishes a large expanse of scenery. The opening shots of one of the best cyberpunk movies Blade Runner use them to establish futuristic cityscapes.

Ultimate Guide To Camera Shots - An Aerial Shot Captures Los Angeles In Blade Runner

Types of Camera Shot Angles: Aerial Shot Example in Blade Runner

Affordable drones have made aerial photography more accessible to filmmakers. Once considered a big-budget luxury or stock-footage mainstay, original aerial photography is now within reach of almost any production, all thanks to the “rise” of drones (and Sky-net).

Blogger-Akash Shinde😍 (Assistant Director)

Student of journalism and Mass communication.
Different Types of camera Focus using Filmmaking process..

Types of Camera Shot Focus

THE VIEWER’S POINT OF ATTENTION
  1. Rack Focus / Focus Pull
  2. Shallow Focus
  3. Deep Focus
  4. Tilt-Shift
  5. Soft Focus
  6. Split Diopter.
  7. Cinema and television give the director an uncanny ability to control the audience’s vision. You can shift and change points of view as people learn new information, move locations, or switch perspectives.

What is depth of field?

Depth of field (DOF) is the term used to describe the size of the area in your image where objects appear acceptably sharp. The area in question is known as the field, and the size (in z-space) of that area is the depth of that field.

The center most point of the field is known as the point of focus. The imaginary two dimensional plane that extends from that point is known as the plane of focus. And any part of your image that falls directly on this plane is officially in focus.There are various types of camera focus to choose from, each with their own unique storytelling properties. Here’s a video breakdown of each type with examples of how they enhance the visual storytelling.Here is a shot list with all the types of camera shot focus:

Plan focus changes on your shot list

Filmmakers often want to direct attention around different parts of the scene. To do this, you need to decide on the angle of shot, camera movements, and any special equipment needed to pull it off.

CAMERA SHOTS FOCUS TYPES

Rack Focus vs. Focus Pull 

Manipulating focus is another way of communicating with your camera shots. The vast majority of films you watch will keep their subjects in focus 95% of the time, with the odd slip up here and there.

The first assistant cameraman (or “First AC”) will pull focus to make sure that the subject stays within the acceptable focus range while they move to various depths within the frame.

rack focus is an emphasized focus pull, where the acceptable focus range is intentionally shifted from one subject to another. This is an aggressive use of focus as a story telling device:

Focus Pull = Passive vs. Rack Focus = Aggressive

Now, this doesn’t mean that pulling focus is easy, and in fact it is much harder to maintain focus by making micro adjustments vs setting up a rack focus on a set mark. It’s just a matter of the viewer taking notice. 

TYPES OF CAMERA SHOT FOCUS

Shallow Focus Shot (Shallow DOF)

In shallow focus shots, your subject is in crisp focus while the foreground and background scenery is out of focus. This limits your depth of field to create emphasis on your subject.

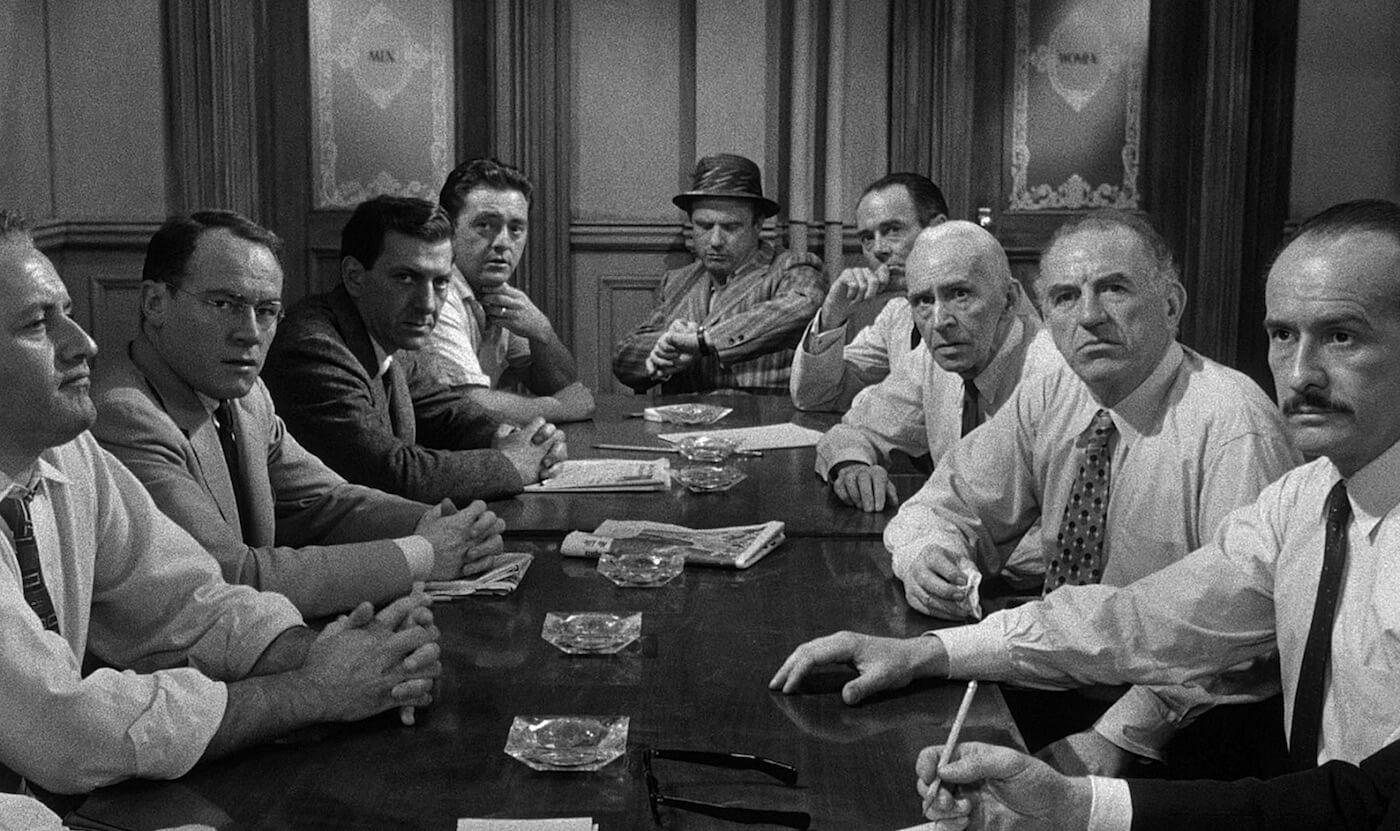
Deep Focus Shot 

In a deep focus shot, everything in your frame is in focus. This is when you need your audience to feel the scenery or particular scene elements.

Ultimate Guide To Camera Shots - A Deep Focus Shot Shows Most Of The Gang In 12 Angry Men
Deep focus.

Tilt-Shift Shot

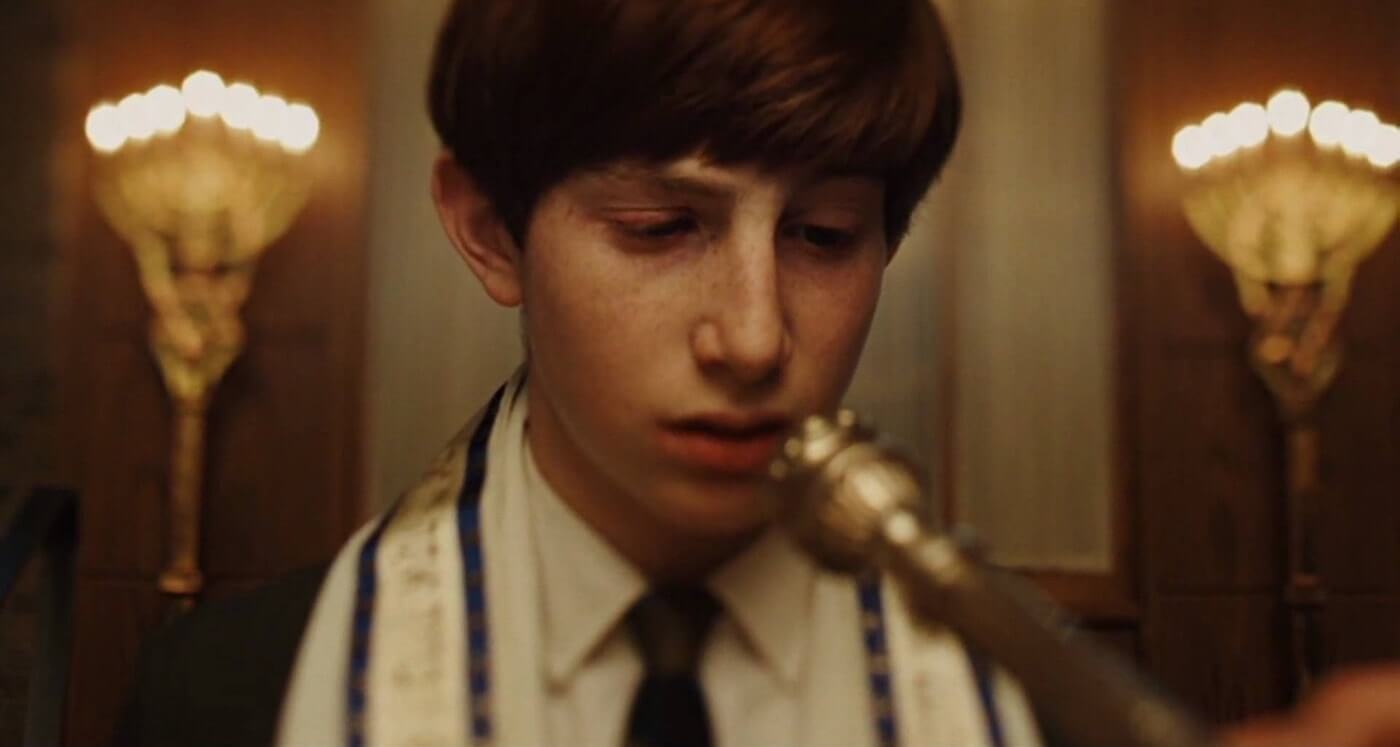
tilt-shift lens rotates perspective within the lens and emulates selective focus. It can make parts of your image appear in sharp focus while others are out of focus.

Ultimate Guide To Camera Shots - Tilt Shift Lens Captures A Trippy Bar Mitzvah From A Serious Man

Film Shots Example: A tilt-shift lens captures a trippy bar mitzvah in A Serious Man

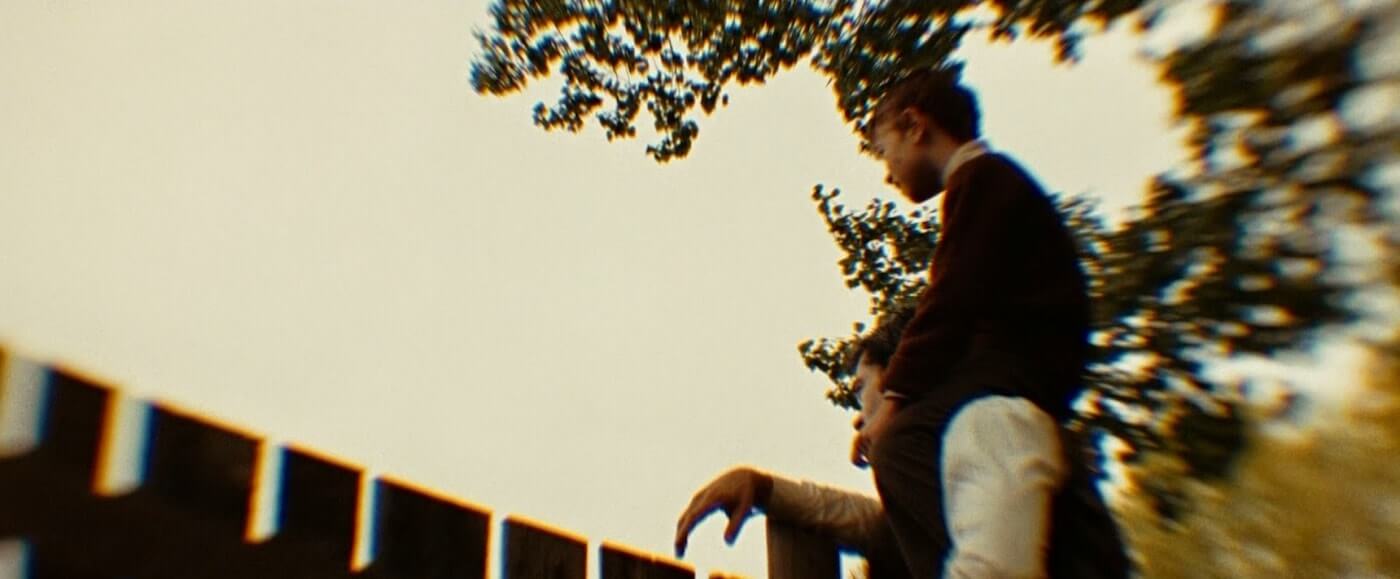
Here’s another tilt-shift shot example from The Assassination of Jesse James by the Coward Robert Ford:

Ultimate Guide To Camera Shots - A Tilt Shift Lens Creates Dreamy Distortion

Film Shots Example: A tilt-shift lens creates dreamy distortion

TYPES OF CAMERA FOCUS

Soft focus

Whereas deep focus keeps everything in focus, and shallow focus keeps something in focus, soft focus shots keep nothing in 100% sharp focus. This is caused by either a flaw in the lens itself or through special filters.

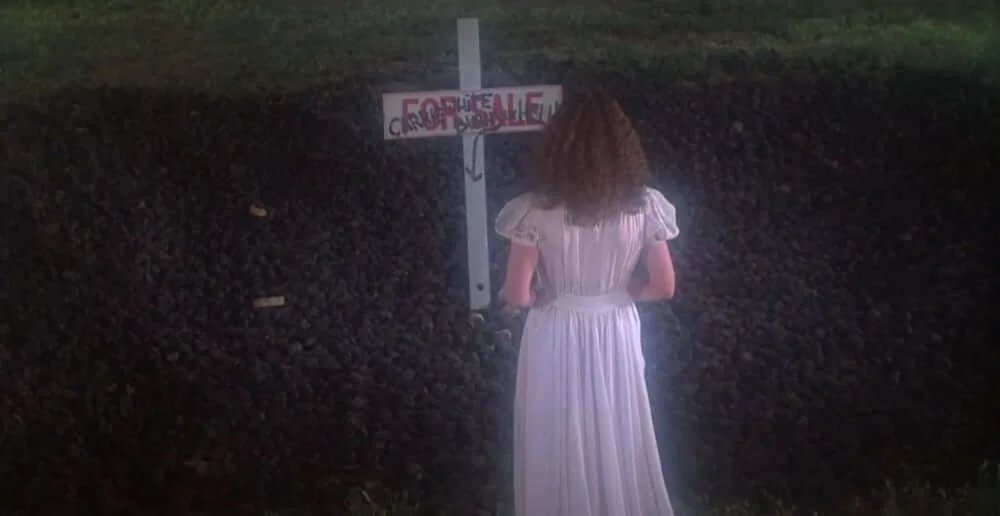
Ultimate Guide to Camera Shots - Soft Focus - Carrie

That Soft Focus Glow in Brian De Palma’s Carrie

Soft focus is perfect when filming a dream or memory — the glow around everything is both wistful and slightly unreal.

TWO PLANES OF CAMERA FOCUS

Split Diopter

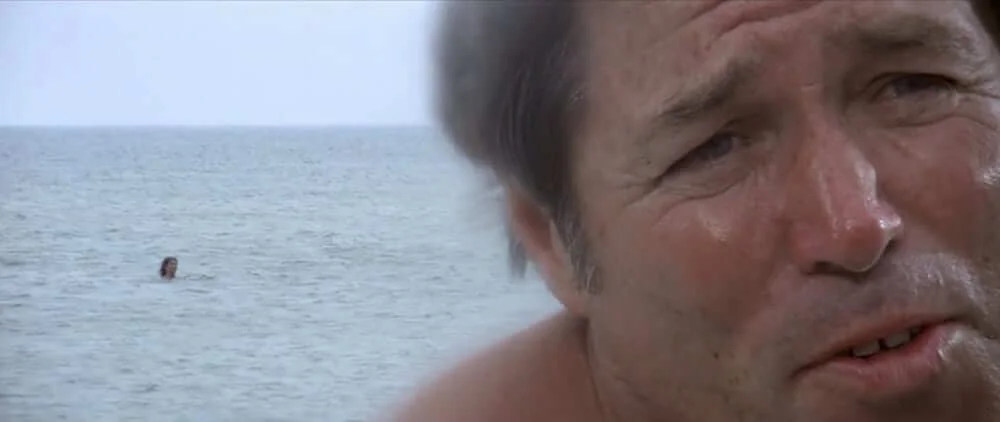
A split diopter is an additional lens element that allows for two simultaneous focal lengths. In other words, you can achieve shallow focus in the foreground AND in the background, while the middle ground remains out of focus.

Ultimate Guide to Camera Shots - Split Diopter - Jaws

Split Diopter Shot in Jaws

This is a highly stylized shot and tends to draw attention to itself because it is “unnatural.” The human eye can see in deep or shallow focus but not both at the same time, which is why this type of camera shot should used with caution. 

Blogger-Akash Shinde😍 (Assistant Director)

Student of Journalism and mass communication.
Different Camera Framing using in Filmmaking process?

Types of Camera Shot Framing

WORKING WITH SUBJECTS IN THE FRAME
  1. Single Shot
  2. Two Shot
  3. Three Shot
  4. Over-the-Shoulder Shot (OTS)
  5. Point-of-View Shot (POV)

For filmmakers and videographers, a major consideration for framing is the number of subjects you feature in your shots, and their physical relationship to each other and the camera.

What is camera shot framing?

Camera shot framing is the art and science of placing subjects in your shots. Camera shots are all about composition. Rather than pointing the camera at the subject, you need to compose an image.

Based on how you plan to position your subjects, you’ll need to adjust your camerawork. You’ll want to capture your framing details on a shot list well before you arrive on set. That way you have a clear idea for the scene and can communicate your vision with ease.

That’s not to say that things may not change the day of the shoot. But, having a shot list at the ready showcases that the director and DP have done their homework and are well prepared.

This video is a quick rundown of all the types of shot framing, how they work, and when you might consider using them in your next project.Here is a shot list showcasing all the types of shot framing that you can download and use as a reference the next time you sit down to shot list:

Single Shot

When your shot captures one subject it’s known as a single shot:

Single shots can be set and framed in any shot size you like, just as long as there is only one character featured within the frame.

Now, why did I say featured rather than simply in the frame?

The reason is because you can have an over-the-shoulder single, also known as a “dirty single” that technically has more than one person in the frame, but the character in the foreground isn’t featured:

Two Shot or 2-Shot

two-shot is a camera shot with two characters featured in the frame:Two shots are often really useful for allowing performances to play out in a single take, which can be especially useful for comedy. 

Three Shot or 3-Shot

three-shot features three characters in the frame:Three shots are really important in adventure films, or really any film that has a group of characters, because it is an enormous time drain to shoot 3 singles just to show every character, not to mention jarring.

Over-The-Shoulder Shot (OTS)

Another element of camera shots to consider is the perspective of the shot. An over-the-shoulder shot shows your subject from behind the shoulder of another character. Because it emulates perspective, it’s common in conversation scenes.Over-the-shoulder shots can help to provide orientation, and connect the characters on an emotional level. Here’s our breakdown of the Westworld scene and how OTS shots work so effortlessly.

Over-The-Hip Shot (OTH)

An over-the-hip shot is similar to over-the-shoulder in that the camera is placed with a character’s hip in the foreground, and the focus subject in the plane of acceptable focus. 

Here’s an example of an over-the-hip shot from one of the best Steven.You’ll gain a similar effect from an over-the-hip shot as you would an OTS, but if you have one character standing, and the other sitting, kneeling, or any other configuration that places the subjects on “uneven terrain” it will often suggest a power imbalance. This is the benefit of blocking and staging your actors and camera.

Point of View Shot (POV)

Now let’s talk about choosing camera shots that show the point-of-view (or POV) of one of your characters.

POV shot is a camera shot that shows the viewer exactly what that character sees. This transports the audience into that character, as is done in Being John Malkovich:POV shots can also invoke horror, as seen in one of the best horror movies Halloween:

point of view shot (POV) is generally sandwiched between two other shots, a technique called shot-reverse shot:

  1. A camera shot of a character looking at something
  2. Cut to your (POV) point of view camera shot
  3. A camera shot showing the character’s reaction

A point of view shot shows us exactly what the character sees, and we get to understand what’s generating the character’s reaction..

Blogger-Akash Shinde😍 (Assistant Director)

Student Of Journalism and Mass communication..

Design a site like this with WordPress.com
Get started